What to expect when you’re expecting

(to virtualize a course)

If you are on a Mac and have the Catalina OS or newer and will need to screenshare in Zoom or BigBlueButton, please follow the steps in this video to enable screensharing.

Each course will be assigned a Liaison. There are a handful of Liaisons for all of CIIS. This person can assist faculty by:
– basic troubleshooting of connection issues, connecting headphones, sharing screen, etc.
–       uploading/updating Zoom polls (if faculty provided it in advance to onlinelearningsupport@ciis.edu)
–       creating any breakout rooms as needed (if faculty indicated the need in advance to onlinelearningsupport@ciis.edu).

Courses will not be recorded. The classes will not be available for viewing afterward.

In case you get disconnected, rejoin using the same method you had initially used. Make sure to follow all instructions for joining the audio properly. If you still have issues, please use www.VCLhub.com for immediate chat support with a Virtual Course Liaison.
 
Chats. Try to check the chat space or volunteer to monitor the chats and tell the instructor if something needs their attention, e.g. a relevant question about the topic. Secondarily, the chat can be used to troubleshoot with participants who have audio/video trouble. The Virtual Course Liaison will leave the best way to contact them during your class time in the chat box, so please check it before class begins.

Need help?
– For help during a virtualized class meeting, please chat us at www.VCLhub.com.
– For help outside of class meeting hours, please contact onlinelearningsupport@ciis.edu.
– For issues with CIIS email or updating settings, please contact IT: support@uswired.com.

What can I do in advance? 

  1. Find a quiet place free from distraction.
  2. Do not forward your CIIS email account to another address (e.g. Gmail). You might not receive the link emails. Microsoft might mark them as spam or not deliver them to your forwarded address.

    1. To stop mail forwarding:
      Log in to Office.com using your CIIS email credentials. Click on the gear icon in the upper right and go to the bottom of the drop-down window (scroll down if necessary) and select Mail > Forwarding > Stop Forwarding > Save.
    2. To check your CIIS email account directly:
      Log in to Office.com using your CIIS email credentials and select the Outlook icon:Envelope with square O beside it.
    3. Please use Chrome or Firefox only. If possible, close other data-heavy tabs/apps before class, e.g. Facebook and streaming (including by others sharing your wireless network). Work close to your router or if possible, use a wired connection.
  3. Check your permissions before class:
    1. If using Chrome, please check your Chrome settings to allow webcam and microphone access. Make sure that Zoom doesn’t appear in the “Blocked” category for Mic. Do the same for Webcam.
    2. Additionally, if you are on a Mac and have the Catalina OS or newer, please follow the steps in this video to allow screensharing.
    3. If you have trouble with either of the above, before your class, please contact IT (support@uswired.com).
  4. If you’ll be connecting from home, you may wish to perform a speed test. For effective video, you must have at least 0.5 Mbits/second upstream and 1 Mbits/second downstream. If your internet does not meet these requirements, the class might not run smoothly and you could be dropped from the meeting.
  5. For audio we strongly recommend using a headset. Wearing earbuds or headphones will reduce the amount of background noise that your computer will pick up. Any headset with a built-in microphone should be fine. If you have no headset, please turn down your speakers to reduce echo.

    If you encounter audio issues, check that Bluetooth headphones are not inadvertently connected (e.g. AirPods). For a demonstration of testing your audio, watch this Zoom support video (end at 1:09).

Students

  1. Enter using a recognizable name, e.g. the one used by the registrar’s office or Canvas (not fuzzycatlover@gmail.com).
  2. Mute yourself upon entry if you’re not already muted. Be ready to unmute yourself and turn on webcam if possible.
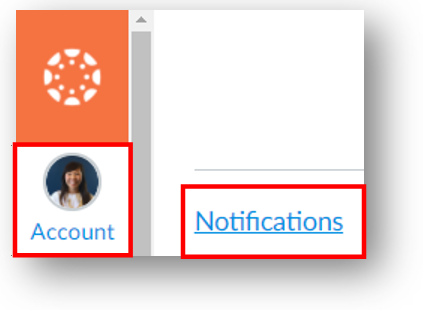
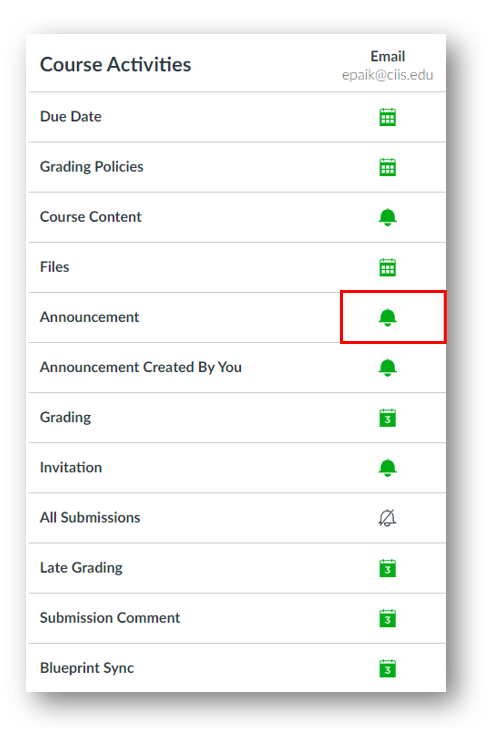
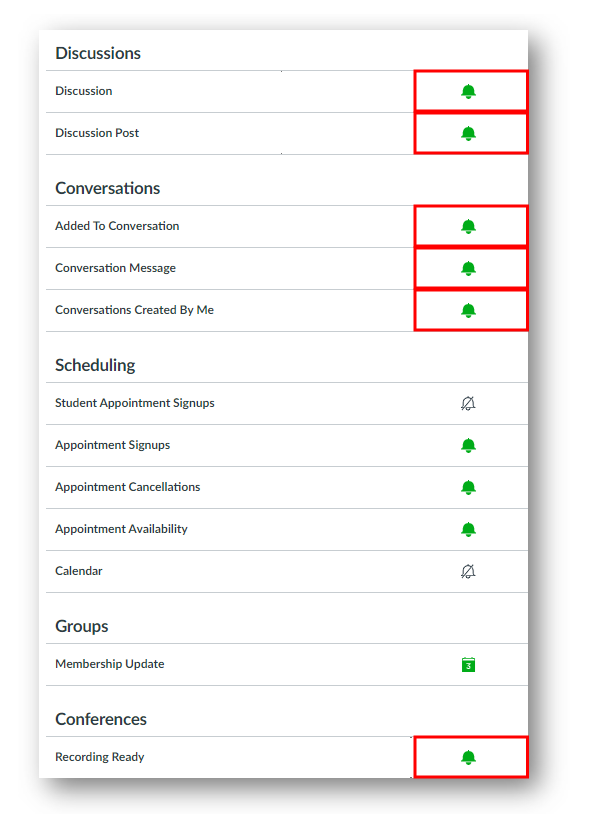
  3. Make sure you are set up to receive certain Canvas notifications immediately. (Log in to Canvas > click Account > click Notifications > click the first column for the row called Do the same for Added to Conversation and Conversation Message. Your changes will auto-save.)

Instructors

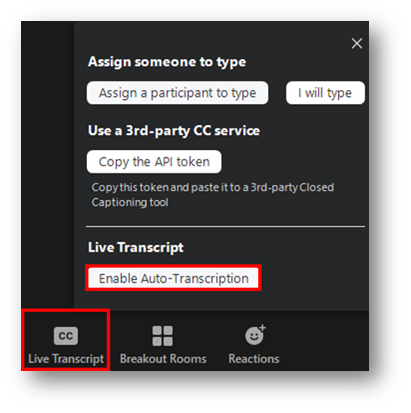
If you need help breaking your class into small groups, please tell onlinelearningsupport@ciis.edu the time you will need Breakout rooms, and if room assignments can be random (recommended), manual, or whether students can choose. Your Liaison can assist with creating Breakout rooms during your class meeting.

    1. Random (recommended)
    2. Manual: You can provide a list of names and rooms to your Liaison in advance so they can manually set up the rooms during your actual session (this will take a few moments).
    3. Students can also choose their own rooms.

Troubleshooting tips during the session

  • If your Internet connection is slow or lagging, consider temporarily turning off your video and only maintaining the audio connection. Sometimes, running the webcam will use up your bandwidth in a way that can make communication challenging. Turning off the video should improve communication quality and stability. 
  • If you are experiencing issues with an echo, try wearing earbuds or a headset if you have them. If not, reduce the volume on your speakers. 
  • Make sure any Bluetooth headphones aren’t connected inadvertently.
  • Mute your microphone if you’re not speaking, and be ready to unmute it quickly.
  • Check the “chat” space for student questions and contributions. Some students may not have working microphones and, therefore, may be unable to contribute by speaking. The chat space is also great for troubleshooting audio glitches.
  • For help during a virtualized class meeting, please visit VCLhub.com for immediate chat support.

Grade an Assignment in Canvas

This article discusses the following topics:
How to grade an Assignment in SpeedGrader
Instructions for viewing instructor annotations (for students).

To watch a video below, click play.
To enlarge a video while playing, select the fullscreen icon: Fullscreen icon.
To hide or show subtitles while playing, select the CC icon: CC icon.
To jump to a specific section, select the table of contents icon:
Table of contents icon.
You can select a chapter (on certain videos only), or type a term into the search field and select a returned result.

How to grade an Assignment in SpeedGrader

SpeedGrader is a tool within Canvas that allows instructors to easily and securely grade student submissions.

The video below demonstrates grading an Assignment in SpeedGrader. Click here to open it in a new tab.


If you are grading Discussions or Quizzes, you will see slightly different options. For instance, when viewing a graded Discussion in SpeedGrader, for each student you will see all of their comments for a particular Discussion forum in a single location. For more information, see the Canvas Community article called How do I grade a graded discussion in SpeedGrader?

For a demonstration of grading a Quiz, please see the Grade a Quiz in Canvas article.

Instructions for Viewing instructor annotations (for students)

Now that you have annotated an Assignment, students must download the graded paper in order to best view your comments.

The video below demonstrates how a student can download a paper with instructor annotations. Click here to open it in a new tab.


You can provide your students with instructions for downloading their papers with your annotations in the following formats:

Grade a Quiz in Canvas

To watch the video below, click play.
To enlarge a video while playing, select the fullscreen icon: Fullscreen icon.
To hide or show subtitles while playing, select the CC icon: CC icon.
To jump to a specific section, select the table of contents icon:
Table of contents icon.
You can select a chapter (on certain videos only), or type a term into the search field and select a returned result.

SpeedGrader is a tool within Canvas that allows instructors to easily and securely grade student submissions.

The video below demonstrates grading a Quiz or exam in SpeedGrader. Click here to open it in a new tab.


If you are grading Discussions or Assignments, you will see slightly different options. For instance, when viewing a graded Discussion in SpeedGrader, for each student you will see all of their comments for a particular Discussion forum in a single location. For more information, see the Canvas Community article called How do I grade a graded discussion in SpeedGrader?

For a demonstration of grading an Assignment, as well as instructions for your students on viewing your annotations, please see the Grade an Assignment in Canvas article.

Captions and transcripts in Zoom

This article only applies to Zoom accounts that are managed by Online Learning.
If your class meets virtually–but your meeting links are not sent by VCL@ciis.edu–then the settings for your Zoom meetings may be different.
For questions about Zoom meetings that aren’t managed by Online Learning, please contact the Zoom account owner (possibly your program) or CIIS IT support@uswired.com.

This guide describes the auto-transcription service using the Zoom desktop client.

For details on Zoom auto-transcription for other devices, as well as the latest information on captions and transcripts in Zoom, please see the Zoom support article.

Prerequisite for auto-transcriptions in Zoom: version 5.0.2 or higher in the Zoom desktop client or Android/iOS mobile app.

Auto-transcription is not yet available in breakout rooms.

What is the difference between subtitles, closed captions, and transcripts in Zoom?

Subtitles (recommended): Convey dialogue as written text. Zoom can provide automatically-transcribed subtitles.
Closed captions: Convey both speech and non-speech elements. Unlike subtitles, they can include descriptions such as [dog barking]. In Zoom, closed captions require a typist who is assigned by the host to provide manual captioning or a third-party closed captioning service.
Transcripts: Convey speech. Zoom can provide automatically-transcribed transcripts. Searchable text with timestamps can appear as the side panel of the meeting. 

Once the Host selects Enable Auto-Transcription, everyone will have several options. Each Participant can make changes to their own display (the Host cannot change the display globally):
A menu showing 3 options: #1 Show subtitle. #2 View full transcript. #3 Subtitle settings.
Show Subtitle [1] displays subtitles on the screen.
View Full Transcript [2] displays subtitles in real time with the speaker’s name and a time-stamp within a panel to the right. (If you had the Participants and Chat panels open, the Transcript will replace them).
Subtitle Settings [3] will open a window where you can adjust the font size of both the subtitles and the chat window.

Enable auto-transcription (Host)

  1. In the black Zoom toolbar, the Host must click the CC Live Transcript button. (If you do not see it immediately, first select the More button, then Live Transcript).

    Then select Enable Auto-Transcription:

    Highlighted CC button with an open menu. Within the menu, Enable Auto-Transcription is highlighted.

This will enable captions for all Participants to view. A CC button will appear in their Zoom toolbar: CC button in a black toolbar.

View Subtitles (Participants)

  1. To view subtitles, Participants can click the CC button:CC buttonand then Show Subtitle:CC button is highlighted and shows menu options. Within the menu, Show Subtitle is highlighted.
  2. Students will display in real time within the Zoom meeting.
  3. (optional) Participants can adjust their own subtitles as follows:
    1. Move the position of the subtitles in the meeting window by clicking and dragging on it:Hand cursor next to a subtitle.
    2. Adjust the caption size by clicking the up arrow ^ next to the CC button and selecting Subtitle Settings:Arrow next to CC button is highlighted with an open menu. Within the menu, Subtitle Settings is highlighted.
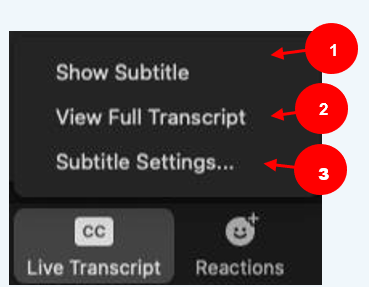
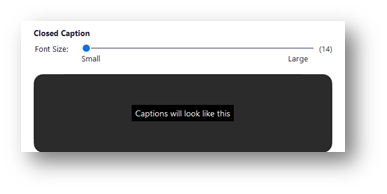
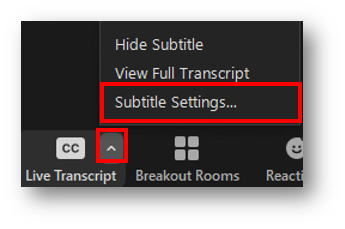
Then move the slider to adjust the caption size:Slider with small font size at the left and large at the right.
  4. Participants can hide subtitles by clicking on the CC button and selecting Hide Subtitle:Arrow next to CC button is highlighted with an open menu. Within the menu, Hide Subtitle is highlighted.

View Transcript (Participants)

  1. To view the Transcript, Participants can click the CC button:CC buttonand then View Full Transcript:CC button is highlighted with an open menu. Within the menu, View Full Transcript is highlighted.
  2. The Transcript will display as a panel at the right of the meeting.
  3. (optional) Participants can adjust the Transcript as follows:
    1. Use the Search transcript field at the top of the side panel:Search transcript field is highlighted at the top of a transcript.
    2. Close or Pop Out the Transcript by selecting the downward arrow icon:An arrow next to the word Transcript is highlighted with an open menu. Within the menu, Close and Pop Out are the options.
  4. Participants can close the Transcript panel by clicking the downward arrow icon and then Close within the Transcript pane:An arrow next to the word Transcript is highlighted with an open menu. Within the menu, Close and Pop Out are the options. Alternatively, they can click the CC button then select Close Full Transcript:CC button is highlighted with an open menu. Within the menu, Close Full Transcript is highlighted.

Use the presentation controls in BigBlueButton

If you are on a Mac and have the Catalina OS or newer and will need to screenshare in Zoom or BigBlueButton, please follow the steps in this video to enable screensharing.

Best practices for virtualized courses using BigBlueButton
 
Important note
For immediate assistance during a virtual course meeting, please visit www.VCLhub.com.

A link to the virtual meeting will be emailed to faculty and student CIIS email accounts at least 15 minutes before class start time. If you cannot access this email account, or you have mail forwarding set up from this account and are not receiving your meeting links in time, please contact support@uswired.com.

Virtualized courses are not recorded based on university policy and federal (HHS HIPAA & FERPA) and state regulations. Virtualized courses are for synchronous (simultaneous) attendance only. Student attendance is required, and the university’s attendance policy applies.

What can I do in advance?
Please use Chrome or Firefox only. If possible, close other data-heavy tabs/apps, e.g. Facebook and streaming (including by others sharing your wireless network). Work close to your router or if possible, use a wired connection.
 
For the latest information on minimum requirements, please see the What are the minimum requirements for BigBlueButton? article from Blindside Networks.

Check your permissions before class:
1.       If using Chrome, please check your Chrome settings to allow webcam and microphone access. Make sure that blindsidenetworks and Zoom don’t appear in the “Blocked” category for Mic. Do the same for Webcam.
 
2.       Additionally, if you are on a Mac and have the Catalina OS or newer, please follow the steps in this video to allow screensharing.
 
3.       If you have trouble with either of the above, before your class, please contact IT (support@uswired.com).
 
If you have a presentation file to share, please try to email it to onlinelearningsupport@ciis.edu at least 24 hours in advance, along with your 6- digit Course ID Number (e.g. ACM 5500-01) and date of your presentation. Your Liaison will upload it for you at the start of class.

As a backup, you may wish to save it as a PDF (File > Save as Adobe PDF in Windows; File > Save As > PDF > Save on Mac). Email it to the class in advance in case they need to open it on their end. (If you don’t have everyone’s email address handy, you can use the Canvas Inbox feature and attach it to a message to your entire class.) Presentations that are saved as a PDF won’t include dynamic transitions, video, etc (only text, hyperlinks, and static images such as photos).

Roles in BigBlueButton

In a BigBlueButton meeting, instructors are generally the Moderator, Presenter, or both. Students are generally Viewers.
Square icon for Moderator. There can be multiple Moderators in a given session. Blue easel at the top left of the square icon indicates Presenter status. There can only be 1 presenter at a time. Circle icon denotes Participant.
Moderators are represented by a square icon. There can be multiple moderators in a given meeting.
Moderators can do the following:
–          Assign anyone (including themselves) the role of Presenter
–          Create Breakout Rooms
–          Mute/unmute Viewers
–          Start and stop recordings
–          End meetings
 
The Presenter is indicated by a small blue easel icon a the top left of a user’s icon. Both Moderators and Viewers can be a Presenter. There can only be 1 Presenter at a time.
Presenters can do the following:
–          Upload and control slide presentations
–          Access the annotation tools
–          Screenshare
–          Use the Share an external video feature (only supports videos from YouTube, Vimeo, Instructure Media, Twitch or Daily Motion)
–          Start a poll

Viewers are represented by a circle icon.
Viewers can generally do the following:
o   Share microphone and webcam
o   Chat
o   Respond to polls
o   Write in the shared notes section
o   Enter Breakout Rooms
 

Only the Presenter has access to the presentation controls. If you are not the Presenter, please request presenter status from a Moderator.

For the latest instructions on this topic, please see the article called Use the presentation controls on the Blindside Networks support portal.

If you have questions about the instructions, please contact onlinelearningsupport@ciis.edu.


Drag and drop

You can drag and drop items to improve navigation for your students.

This function only works in the Assignments tab and the Modules tab (it will not work in the Discussions tab).

To watch the video below, click play.

To enlarge the video, select the fullscreen icon:
Fullscreen icon.

The video below demonstrates re-ordering an item by dragging and dropping it from within the Assignments tab or Modules tab.

Record a presentation with slides and webcam

While there are many methods for recording presentations, you can use the following instructions for most lectures and student assignments.

Below are two commonly used options: Zoom and PowerPoint.
·  To sign up for a free Zoom account (the free version is fine), please go to zoom.us/signup
·  You can install PowerPoint for free as part of the CIIS community by signing in to  office.com (the credentials will be the same as your CIIS email and password). Then select the Install Office button near the top right. For instructions, see the Microsoft guide on installing Microsoft (Office) 365 or contact CIIS IT at support@uswired.com.

You will needDemonstration
Option 1
Use Zoom to screenshare & record your slides.
· Zoom account (the free version is fine).
· Installed Zoom app
· (optional) To enable captions in your Zoom account, see this Zoom Help Center article: Closed captioning and live transcription
Screenshare & record in Zoom.

For a larger view in a new tab, click the link below:
Record Zoom with Slides and Webcam
Option 2
Use PowerPoint to record your slide presentation. Save it as a movie file.
· The installed  version of PowerPoint (not the web version).
· PowerPoint slides.


Record presentation in PowerPoint and save it as an Mp4 file.
 
For a larger view in a new tab, click the link below: 
Record a PPT with webcam as MP4


If you are using a Mac and experience issues with saving the file as an Mp4 using the instructions above, first confirm that you are using the desktop (not online) version of PowerPoint.
Then:
1.       Go to File > Export.
2.       In the window that opens, select where to save the file.
3.       In the File Format field, select MP4.
Mp4 selected in the File Format field.4.       Select Export.

After creating your recording, you can share it in many ways. Below are methods for uploading it to Canvas as an Assignment, or as a different Canvas item.


Upload to Canvas

There are two ways to upload a video to Canvas:

  1. If you are a student needing to submit a video as an Assignment (as opposed to a Discussion), please see the Canvas Community article called How do I submit a media file as an assignment submission?
  2. If you are a student or instructor wishing to upload your recording to Canvas (as an Announcement, Discussion, Page, or Quiz), please see the article called Upload a video to Canvas.

Enable screenshare for Mac computers

To watch the video below, click play.

To enlarge the video, select the fullscreen icon:
Fullscreen icon.
To hide or show subtitles, select the CC icon:
CC icon.
To jump to a specific section, select the table of contents icon:
Table of contents icon.
You can select a chapter (on certain videos only), or type a term into the search field and select a returned result.

For immediate chat support during a virtualized course meeting, please visit www.VCLhub.com.

The video below is intended for Mac computer users with an operating system of version 10.15 (Catalina) or higher.
 

It explains how to manually allow screensharing for applications like Zoom or Chrome and Firefox.

It demonstrates:

  • checking your OS version
  • enabling screenshare within your computer’s system preferences.

View instructor annotations on your papers

While grading your Assignment, your instructor might choose to provide feedback which can include an overall comment and/or annotations on the file itself (much like the comments feature in Microsoft Word). These annotations can help you learn how to develop your work.
 
Please note that most file types can be annotated (.doc, .docx, .odt, .rtf, .txt, Powerpoints, Excel, etc.). However, Assignments that are submitted as Text Entry, Website URL, or Media Recordings cannot be annotated.  Also, some instructors do not use the annotation feature.
 
If you know that your instructor has provided annotations on your Assignment and you would like to access it, please use the instructions below.

  1. Use Chrome or Firefox to log in to your course.
  2. Go to the Grades tab in the course navigation menu.
  3. Select the title of the graded Assignment you wish to view.
  4. Click View Feedback near the top right:View feedback link near the top right of the Assignment
  5. This will open the document in DocViewer within Canvas.
  6. To view the file better, you can download it by clicking the download icon:Downward arrow near top left of the preview window
  7. Depending on your browser settings, the file might download to your computer or open in a new tab.
  8. Open the file. If your instructor provided annotations, you will see them on the page. You might need to hover over the annotation in order to see the associated comment:Cursor is hovered over highlighted text. There is a comment within a popup window.

Canvas Notifications for Students

Notifications are sent to the email address that is specified in your Canvas account.

For detailed instructions about setting student notifications, please check the Canvas guides here.

Notification cadences are detailed below:

  • The Notify immediately icon indicates that you will get notifications for these activities immediately: Bell icon
  • The Daily summary icon indicates that you will be sent a daily digest around 6 or 7:00 pm Pacific daily:
    Calendar icon with a number on it
  • The Weekly summary icon indicates that you will be sent a digest on Fridays at around 6 or 7:00 pm Pacific:Calendar grid icon
  • The Notifications off icon mutes this notification:Bell icon with a line through it
  1. To update notifications in Canvas, start by going to Account in the gray global navigation menu. Then click on Notifications:Account button in the global navigation menu with Notifications in the sub-menu.
  2. We suggest setting the Announcements activity to Notify immediately.

3. Likewise, select Notify immediately for Discussion, Discussion Post, Added to Conversation, Conversation Message, Conversations Created By Me, and Recording Ready. If you find that you are receiving notifications too often, you can modify them later.

Your changes will auto-save (no need to press a save button).