
Table of contents:
Create Breakout Rooms while you are in a meeting
Only the meeting Host or Co-Host can create Breakout Rooms.
Instructors should either:
- ask the Liaison to make them Host then create the rooms themselves using the instructions below
OR - have the Liaison create the Breakout Rooms for you:
- If your Liaison will create them for you, please tell them what time you will need the Breakout Rooms, and whether the room assignment can be random (recommended).
- If room assignments must be manual (e.g. students must be in a group with specific classmates) then please email a list of the room assignments to your Liaison in advance if possible.
Watch this overview video on breakout rooms from Zoom.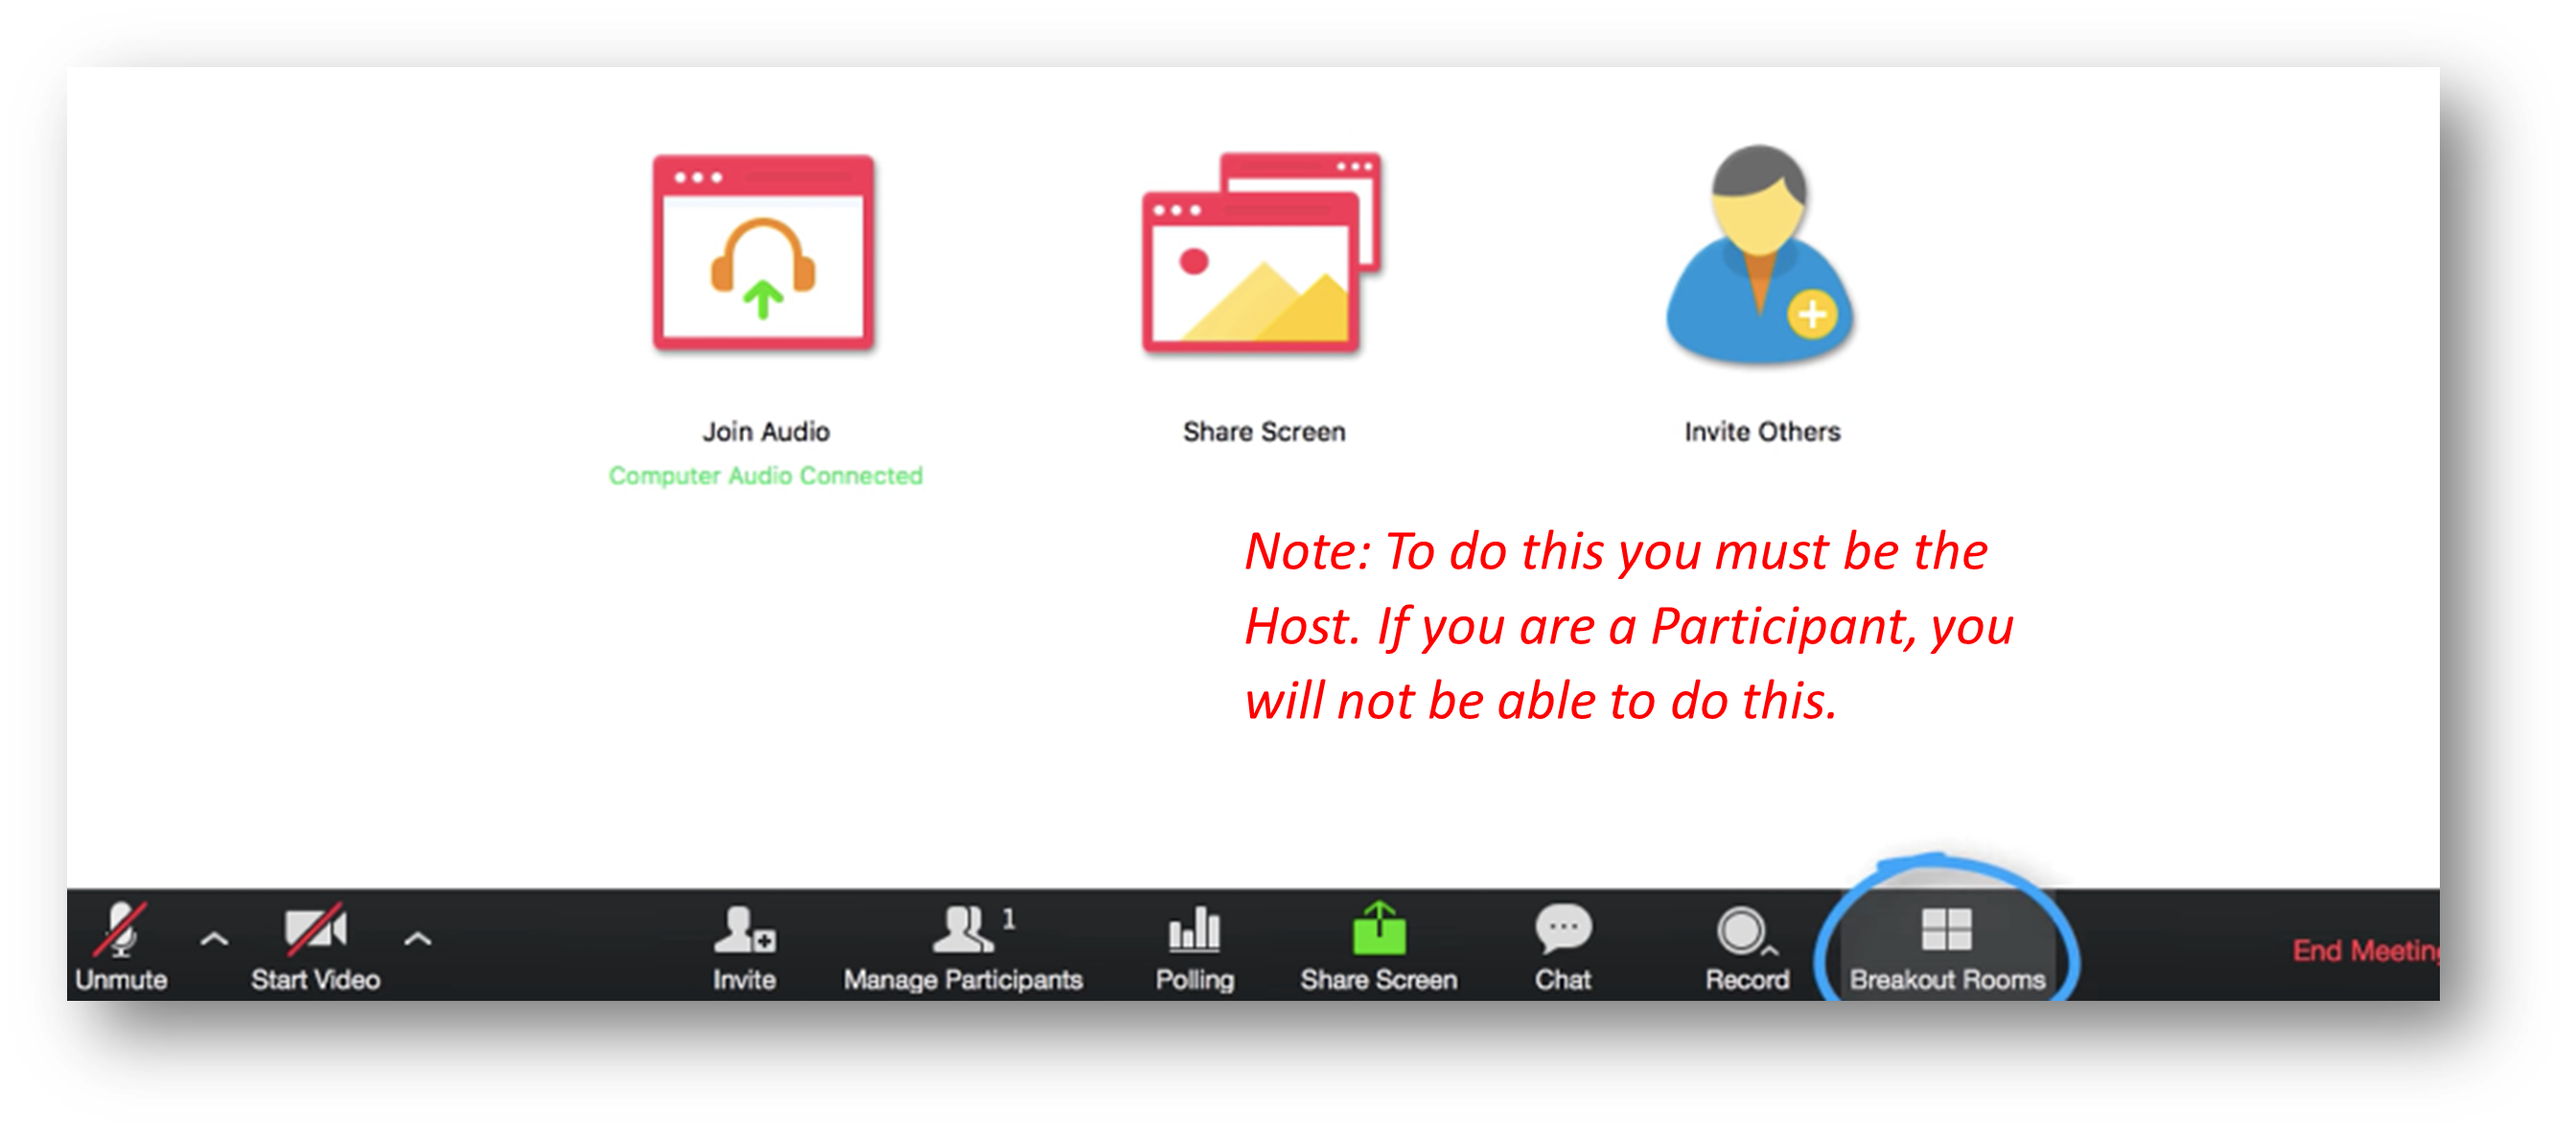
The Host or Co-Host can:
- have Zoom automatically assign participants into breakout rooms (recommended)
- manually assign participants into specific rooms
- or let Participants choose rooms.
Create Breakout Rooms automatically (recommended)
- In the black toolbar along the bottom of your Zoom session, the Host can click Breakout Rooms:

(If you do not see it immediately, click More then select Breakout Rooms.)
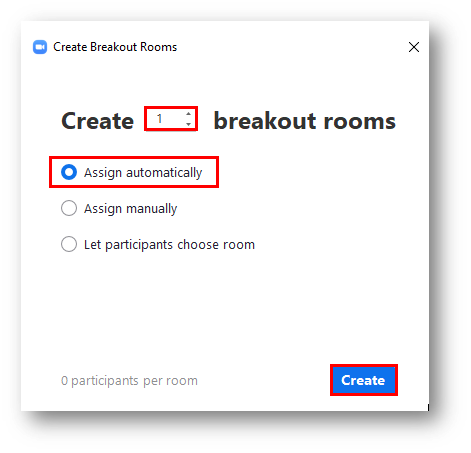
- A dialog box will appear.
- Select the number of rooms
- Select Assign automatically to have Zoom automatically distribute the participants evenly across rooms
- Then click Create. Your rooms will be created, but will not start immediately.
- (optional) Set the duration. Click Options (Windows) or the gear icon (Mac) then enter the number of minutes:
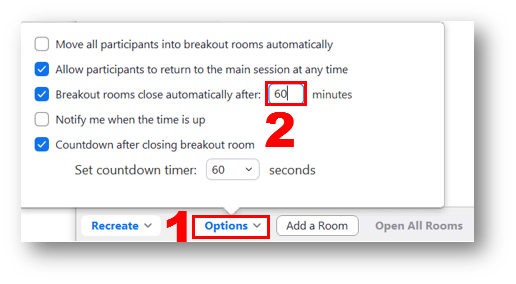
- It is best to over-estimate since you can always end the breakout rooms early.
- Your selections will auto-save–no need to press a “save” button.
- By default, rooms will auto-close after 15 minutes.
- When you’re ready, click Open All Rooms:
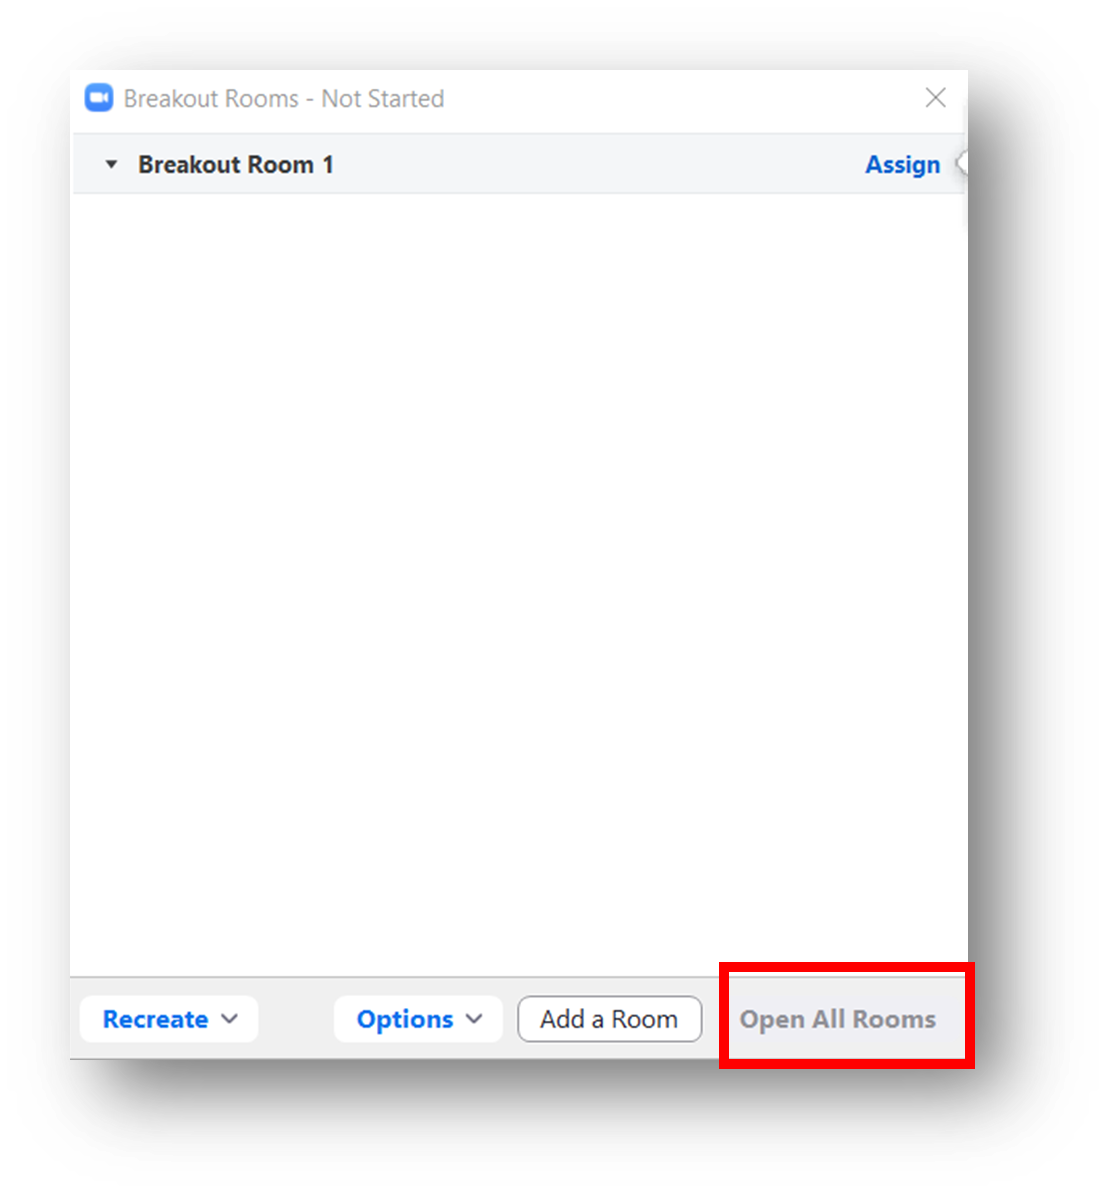
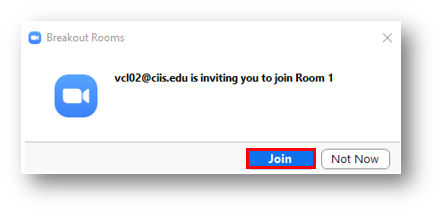
- Participants will receive an invitation to join their Breakout Room. Each Participant will need to click Join:
Participant view - The Host can close the breakout rooms early.
- Open the Breakout Room Manager again (in the black toolbar along the bottom of Zoom, click Breakout Rooms):
- In the Breakout Room Manager that opens, click Close All Rooms:
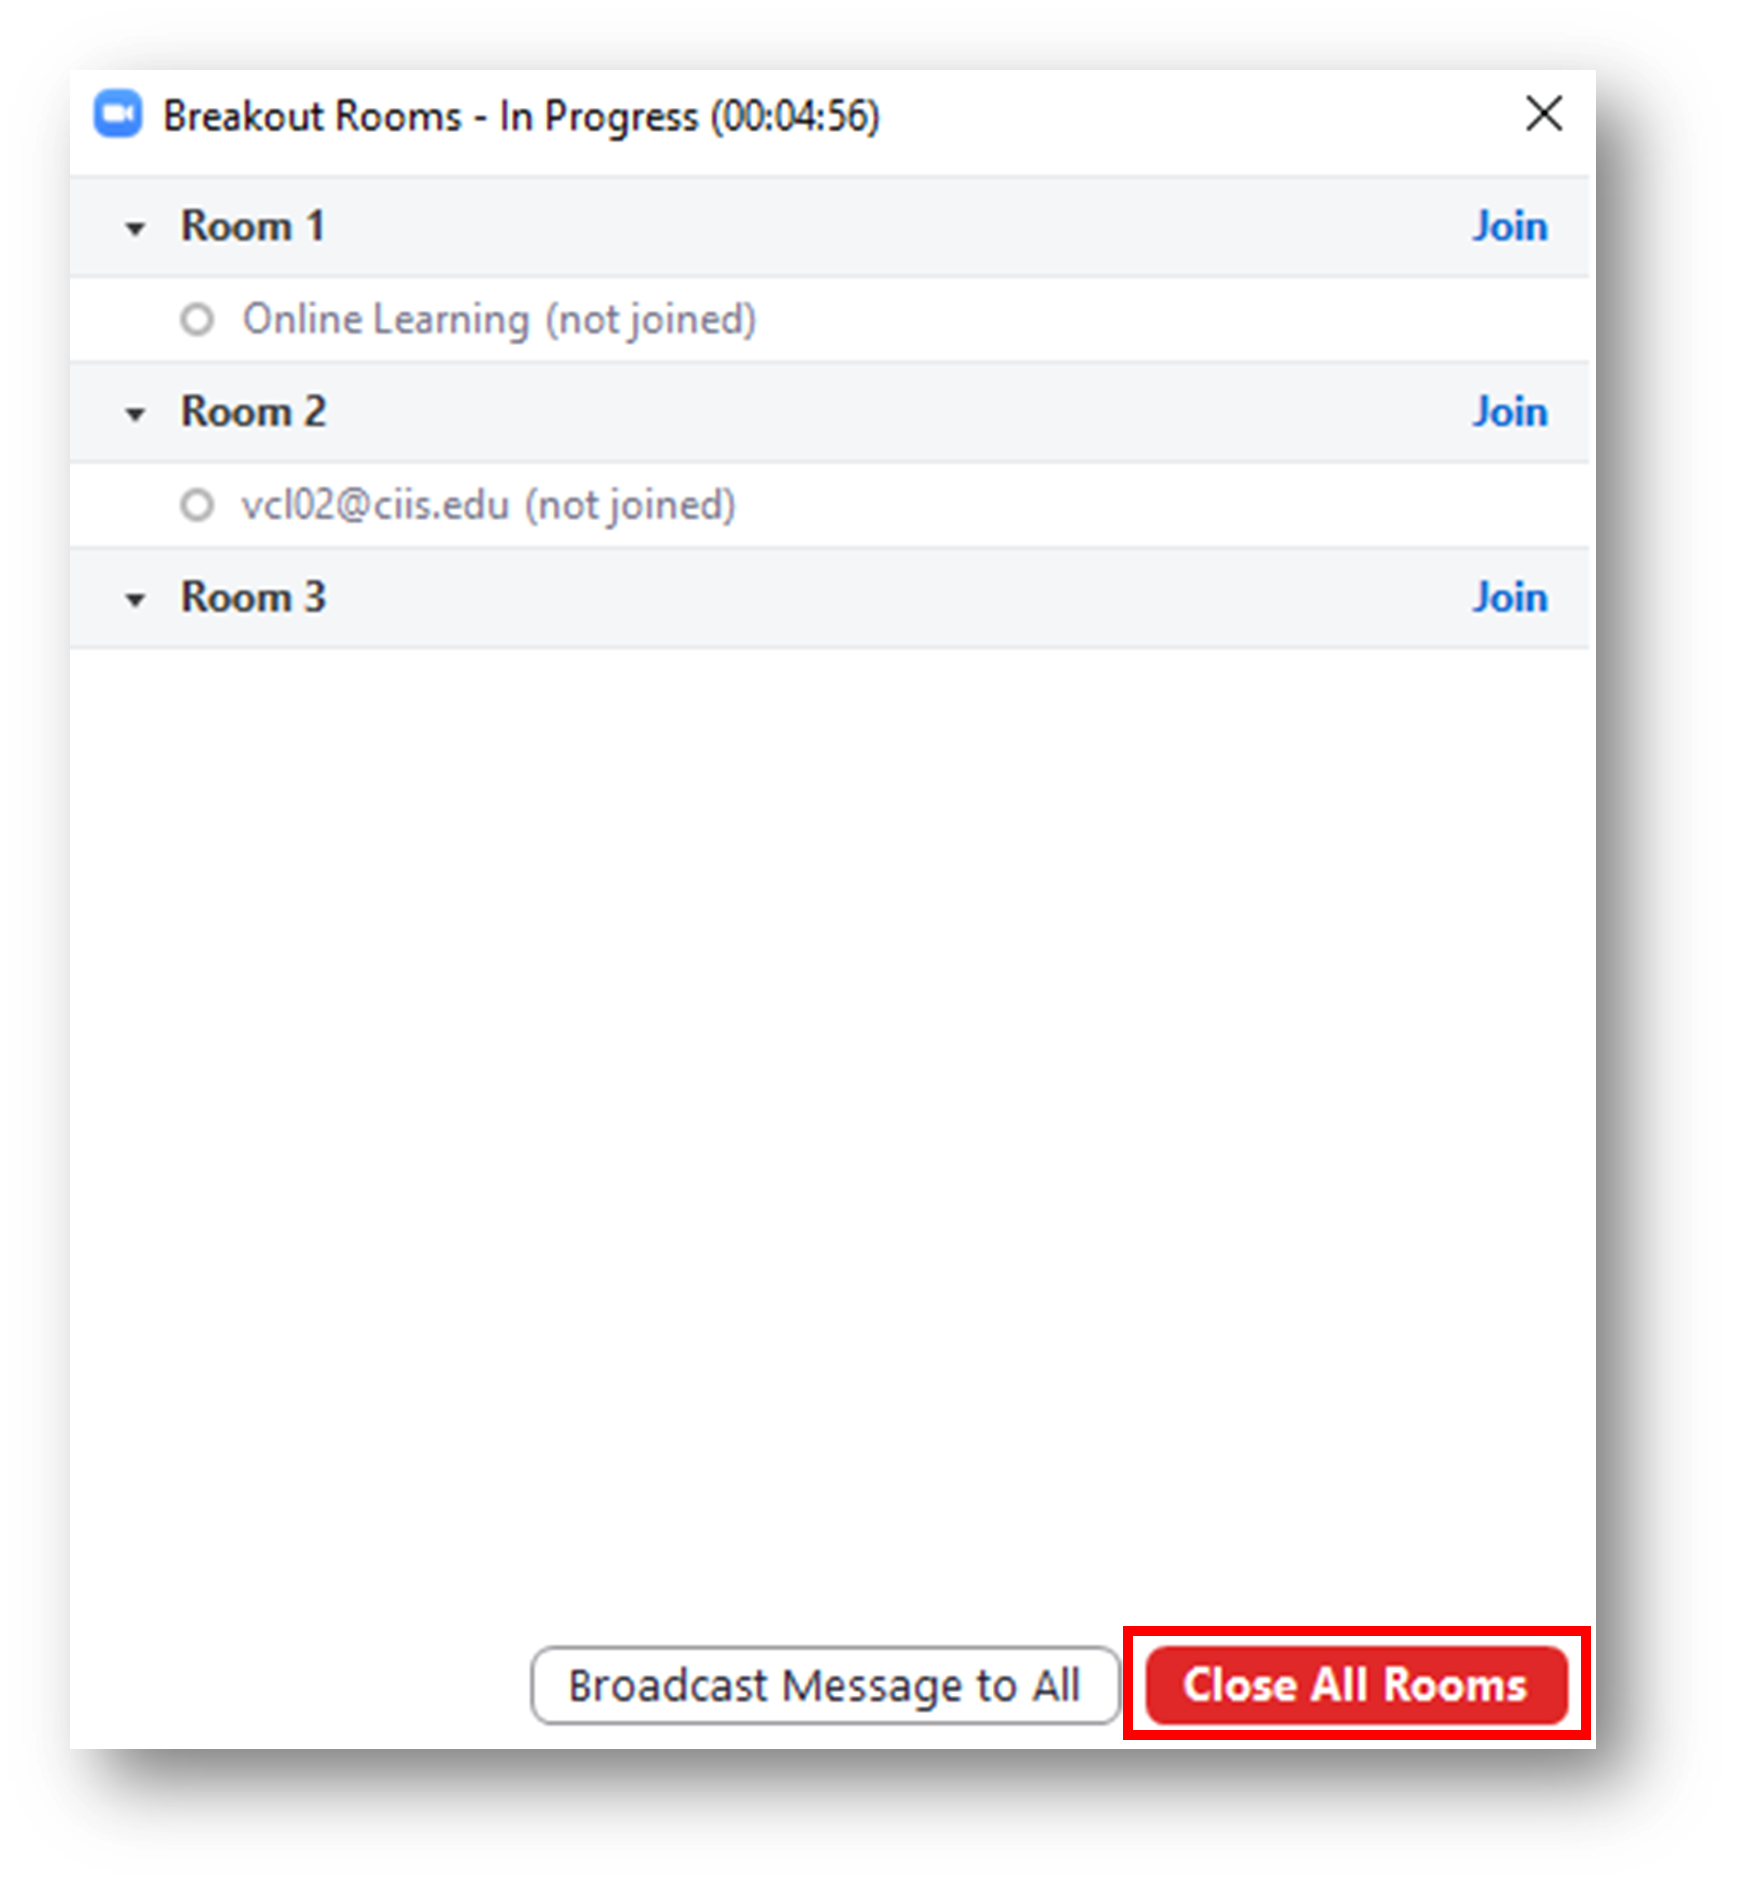
- Participants will receive a notification saying they have 60 seconds to finish their discussion before they’re returned to the main meeting.
- Open the Breakout Room Manager again (in the black toolbar along the bottom of Zoom, click Breakout Rooms):
Create Breakout Rooms manually
- In the black toolbar along the bottom of your Zoom session, the Host can click Breakout Rooms:
(If you do not see it immediately, click More then select Breakout Rooms.)
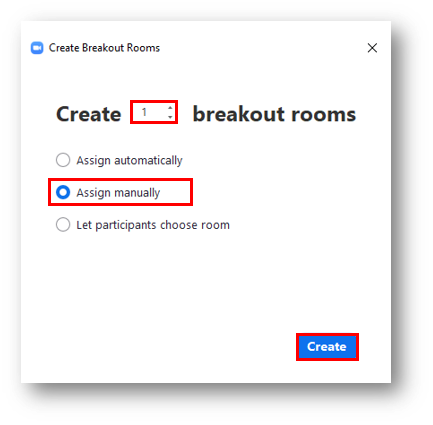
- A dialog box will appear.
- Select the number of rooms.
- Select Assign manually to assign Participants into rooms.
- Then click Create. Your rooms will be created, but will not start immediately.
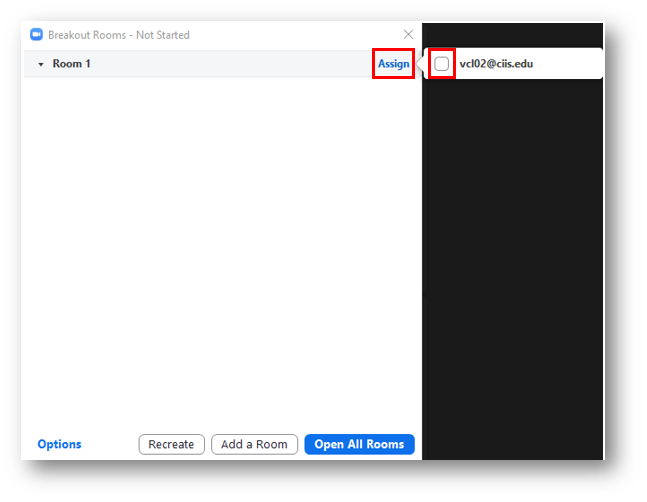
- Your Breakout Room Manager box will open.
- To manually assign a Participant, select Assign next to a Breakout Room, then checkmark the Participant you wish to assign. Repeat this step for any other Participants.
- (optional) Set the duration. Click Options (Windows) or the gear icon (Mac) then enter the number of minutes:
- It is best to over-estimate since you can always end the breakout rooms early.
- Your selections will auto-save–no need to press a “save” button.
- By default, rooms will auto-close after 15 minutes.
- To manually assign a Participant, select Assign next to a Breakout Room, then checkmark the Participant you wish to assign. Repeat this step for any other Participants.
- When you are ready, click Open All Rooms.
- Participants will receive the following prompt to join the room:
 Participant View
 - When Participants click Join, they will enter their respective rooms. The Host will see the number of Participants dwindle from the Main Room.
- The Host can close the breakout rooms early.
- Open the Breakout Room Manager again (in the black toolbar along the bottom of Zoom, click Breakout Rooms):
- In the Breakout Room Manager that opens, click Close All Rooms:
- Participants will receive a notification saying they have 60 seconds to finish their discussion before they’re returned to the main meeting.
- Open the Breakout Room Manager again (in the black toolbar along the bottom of Zoom, click Breakout Rooms):
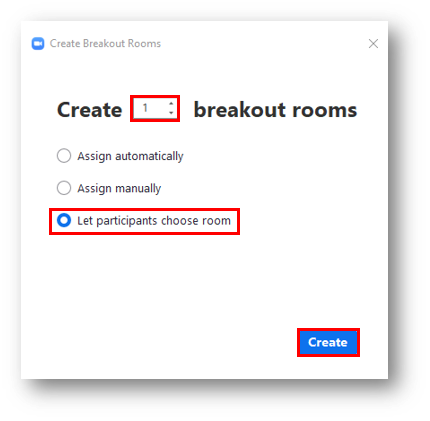
Let participants choose Breakout Rooms
In the black toolbar along the bottom of your Zoom session, click Breakout Rooms:
- In the dialog box that opens, select the number of rooms, then select Let participants choose room. Then click Create:
- Your Breakout Room Manager box will open.
- (optional) Here, you can manually assign one or some Participants to rooms if you wish. These selections can later be overridden by each Participant.
- To manually assign a Participant, select Assign next to a Breakout Room, then checkmark the Participant you wish to assign. Repeat for any other Participants.
- To manually assign a Participant, select Assign next to a Breakout Room, then checkmark the Participant you wish to assign. Repeat for any other Participants.
- (optional) Here, you can manually assign one or some Participants to rooms if you wish. These selections can later be overridden by each Participant.
- (optional) Set the duration. Click Options (Windows) or the gear icon (Mac) then enter the number of minutes:
- It is best to over-estimate since you can always end the breakout rooms early.
- Your selections will auto-save–no need to press a “save” button.
- By default, rooms will auto-close after 15 minutes.
- When you are ready, click Open All Rooms. Participants will now be able to see a Breakout Rooms button in the black toolbar of Zoom.
Also, they will briefly see a notification that says Join a breakout room above it: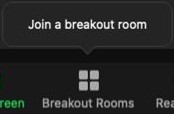 Participant view
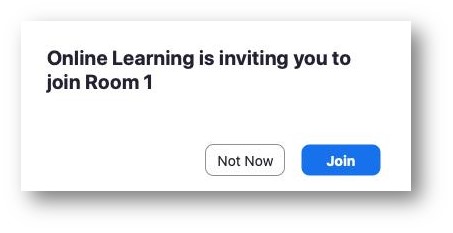
- Please note that if you had optionally assigned some Participants to rooms in the previous step, they will instead receive the following prompt to join the room:Participant view
They can either click Join or select Not Now to override your assignment.
If they select Not Now, they can select a different room by following the steps below.
- Please note that if you had optionally assigned some Participants to rooms in the previous step, they will instead receive the following prompt to join the room:
- Participants will now be able to see the Breakout Rooms button in their black Zoom toolbar. Each Participant will need to click it:
- In the Breakout Rooms menu that will appear, each Participant can choose their room by selecting the Join link next to the room they wish to enter. (Please note they may need to hover over the blue number first, which will change to a Join link). They must click Yes to confirm their choice.
If you had previously assigned some Participants to rooms, in this step they can override your assignment.
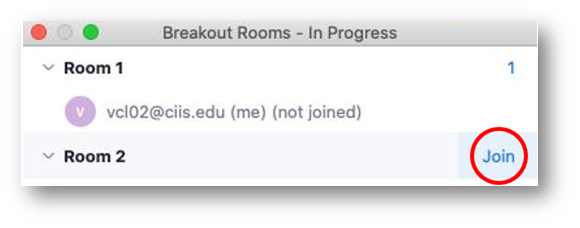
Participant view. A Participant can hover over the blue number next to a room until it turns into a Join link. They can select Join to enter that room, then click Yes.
- When Participants click Join, they will enter their respective rooms. The Host will see the number of Participants dwindle from the Main Room.
- The Host can close the breakout rooms early.
- Open the Breakout Room Manager again (in the black toolbar along the bottom of Zoom, click Breakout Rooms):
- In the Breakout Room Manager that opens, click Close All Rooms:
- Participants will receive a notification saying they have 60 seconds to finish their discussion before they’re returned to the main meeting.
- Open the Breakout Room Manager again (in the black toolbar along the bottom of Zoom, click Breakout Rooms):
Managing Breakout Rooms
Move a participant into a different breakout room
- The Host can click Breakout Rooms in the black toolbar:
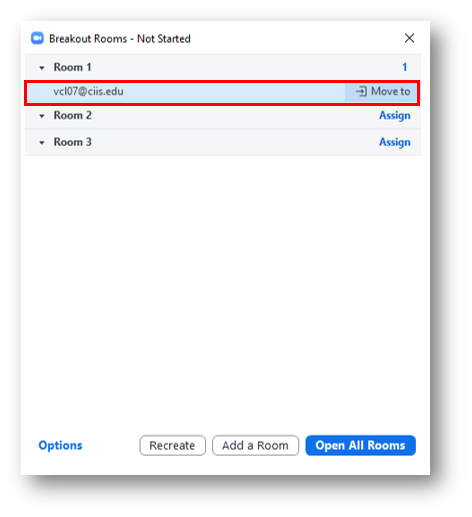
- The Breakout Rooms Manager will open. Hover over the person’s name to see options to move them to another room or remove them from the current room:
Join a Breakout Room after the rooms have been opened
- The Host can click Breakout Rooms in the black toolbar:
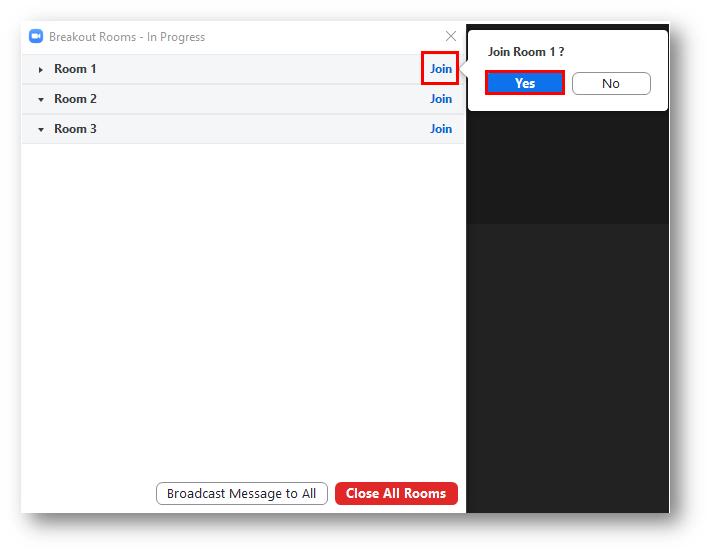
- In the Breakout Rooms Manager that opens, click Join next to the room you wish to join. Confirm by clicking Yes:
-
To leave the Breakout room, click Leave Room:
 You can choose to return to the main room, leave the meeting, or end the meeting for all.
Broadcast a message to all rooms
It will appear in written form as a blue banner at the top of all breakout rooms. Messages cannot be broadcast to specific rooms only.
- The Host can open the Breakout Room Manager (in the black toolbar along the bottom of Zoom, click Breakout Rooms).
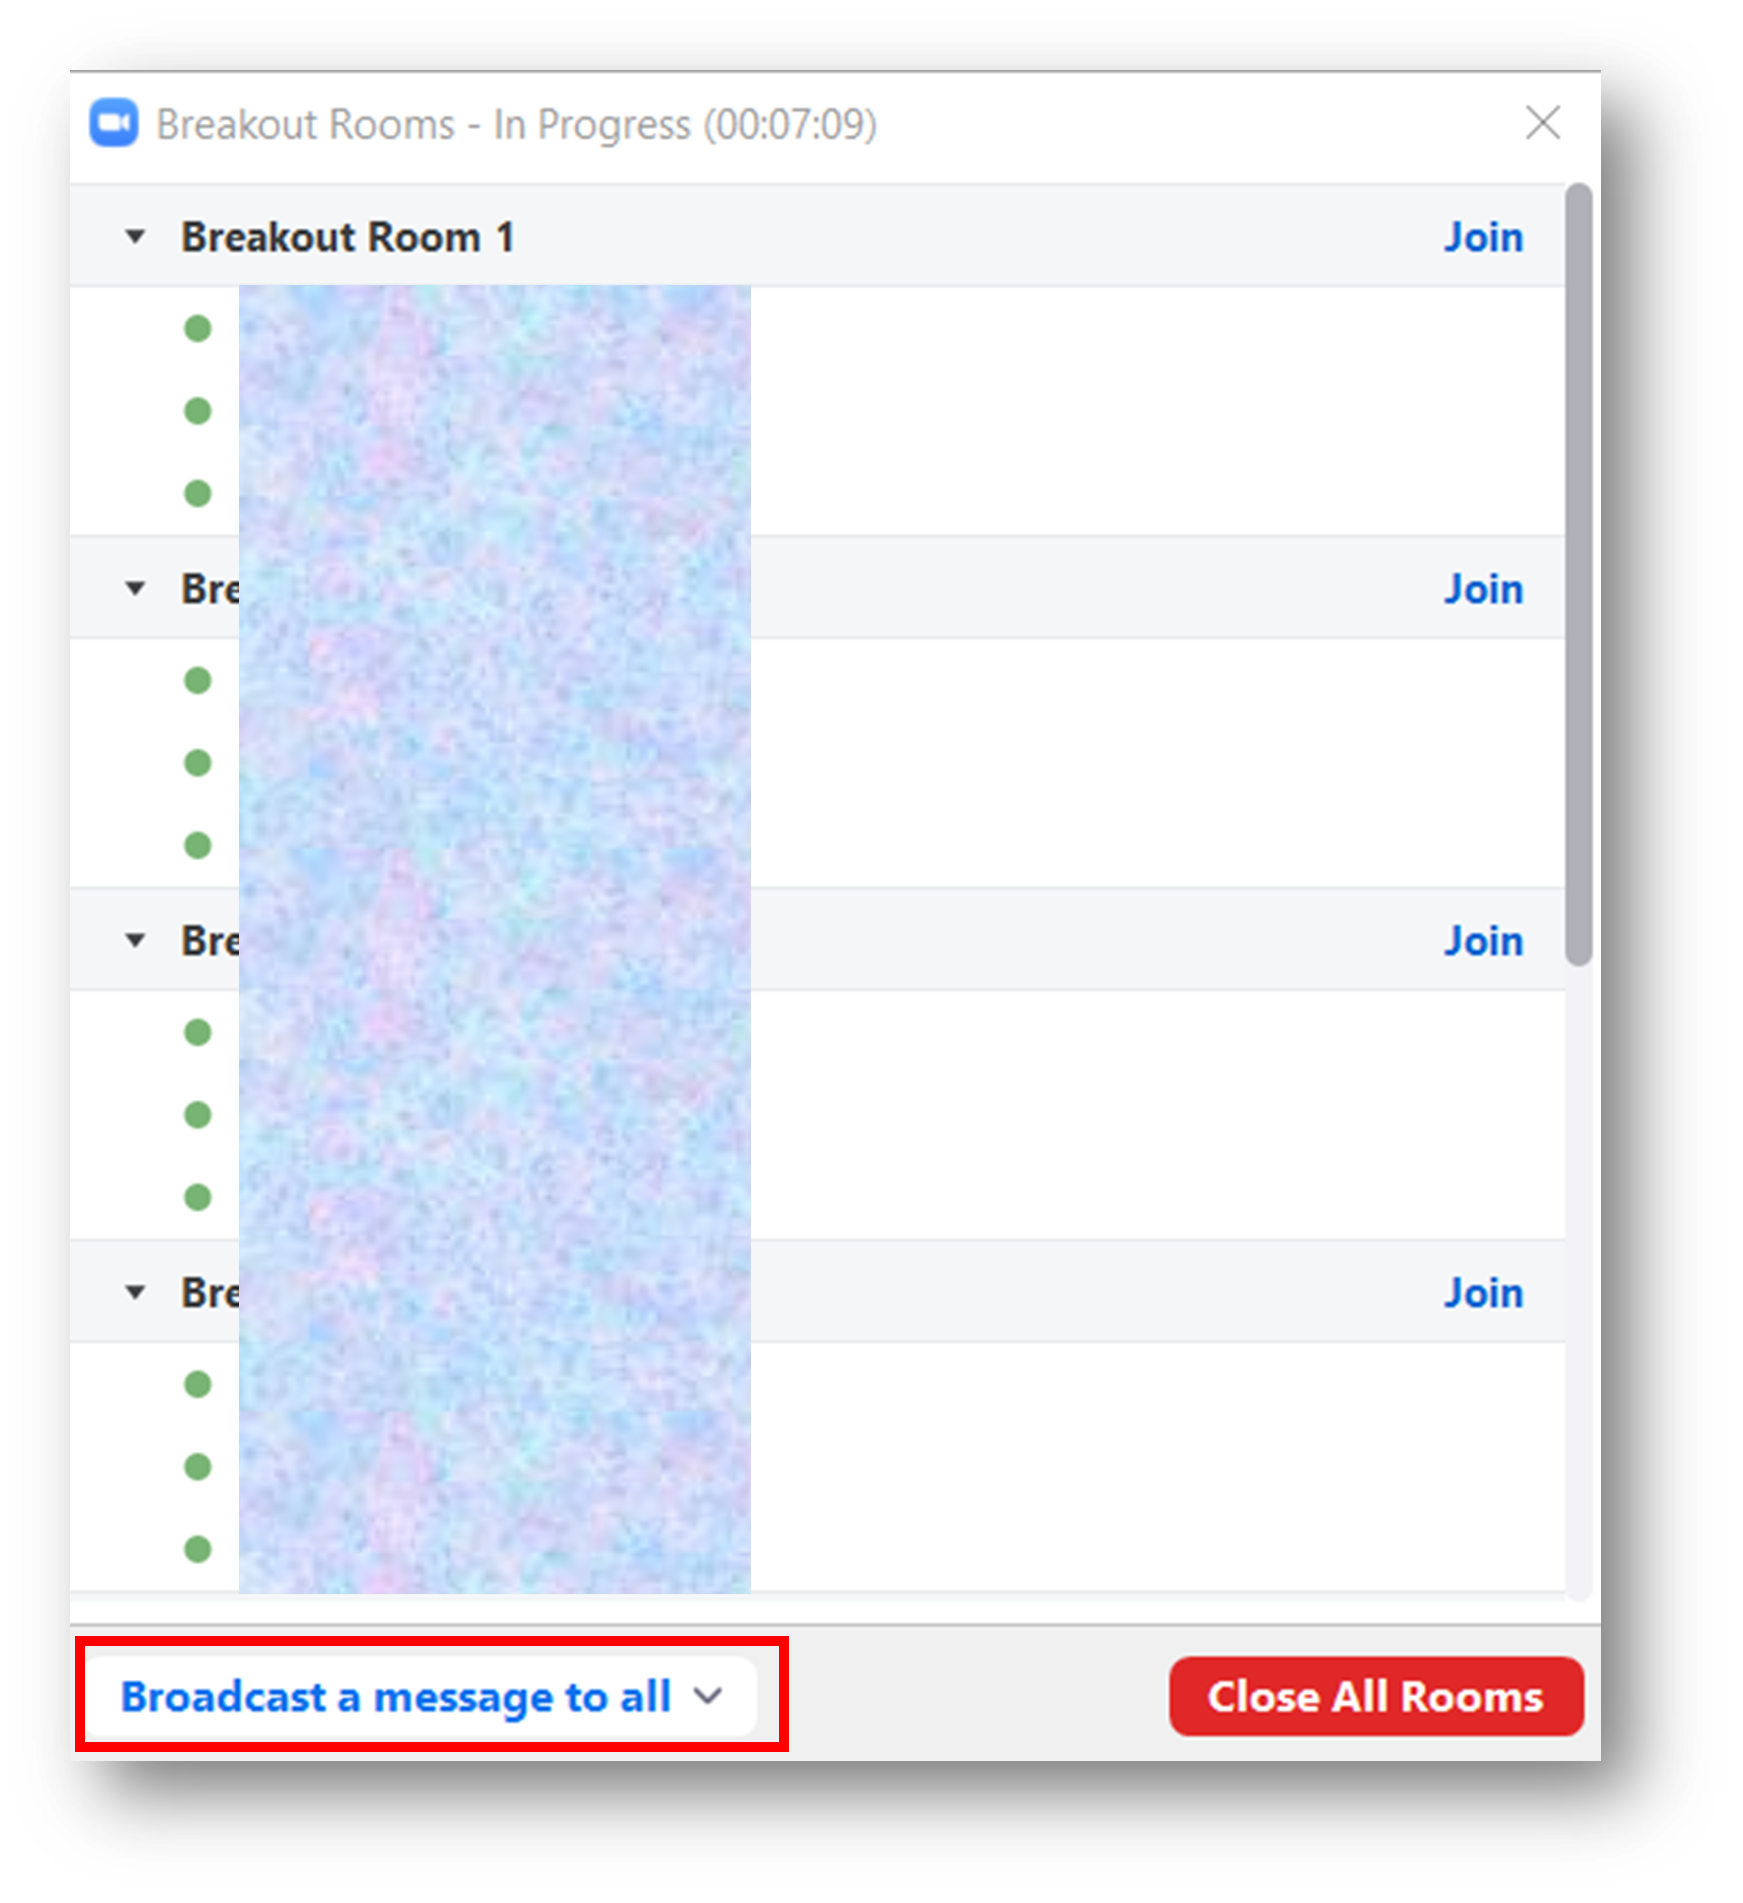
- Click Broadcast a message to all:
- Type your message and click Broadcast.
- Your message will post immediately as a banner at the top of each breakout room:

Delete a Breakout Room
The Host can hover over the room name in the Breakout Room Manager and click the Delete: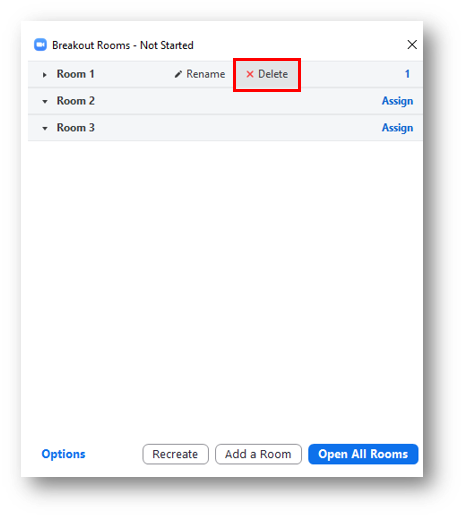
Close the Breakout Rooms early
- The Host can open the Breakout Room Manager (in the black toolbar along the bottom of Zoom, click Breakout Rooms).
- Click Close All Rooms.
- Participants will receive a notification saying they have 60 seconds to finish their discussion before they’re returned to the main meeting.