Share a file in OneDrive

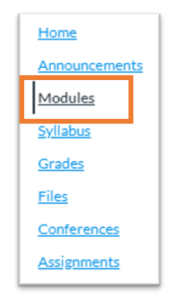
Jump to a section below:

  1. Install OneDrive (optional)
  2. Upload
  3. Share
  4. Common share options
  1. Install OneDrive (optional)

To Share a file you must first upload it (either using OneDrive on the web or the installed desktop client). For an overview of the difference between them, see this training recording (start at 8:12 – 10:27).

If you wish to install OneDrive, first confirm that it is not already installed by going to the magnifying glass at the top right of your computer and typing OneDrive (Mac). On a PC, go to the magnifying glass at the bottom left of your computer, type OneDrive, and press Enter. If your computer uses Windows 8.1 or newer, the OneDrive desktop app is already built in.
 
If you don’t see the OneDrive App as a search result, follow the steps below. For a demonstration of installing OneDrive, watch this Microsoft support video.
 
If you need help installing OneDrive, contact CIIS IT (support@uswired.com). This is suggested if you:
• are using a Mac and wish to integrate OneDrive with your finder (which is recommended), as this requires an extra step;
• if you have an existing OneDrive profile (either a personal account or through another institution);
OR
• if you already have Microsoft (Office) 365 installed and need to delete it and install a newer version.

  1. To install OneDrive, go to https://www.microsoft.com/en-us/microsoft-365/onedrive/download and click Download.
  2. Depending on your browser, select Run (in Edge or Internet Explorer), Setup (in Chrome), or OK (in Firefox).

    If you see a prompt that says, Do you want to allow this app to make changes to your device? select Yes.

  3. Follow the on-screen prompts. If you are prompted to sign in, use your Microsoft (Office) 365 credentials, which are the same as your CIIS email credentials.
  4. Your installation is complete when you see You’re good to go! message. Select Close.
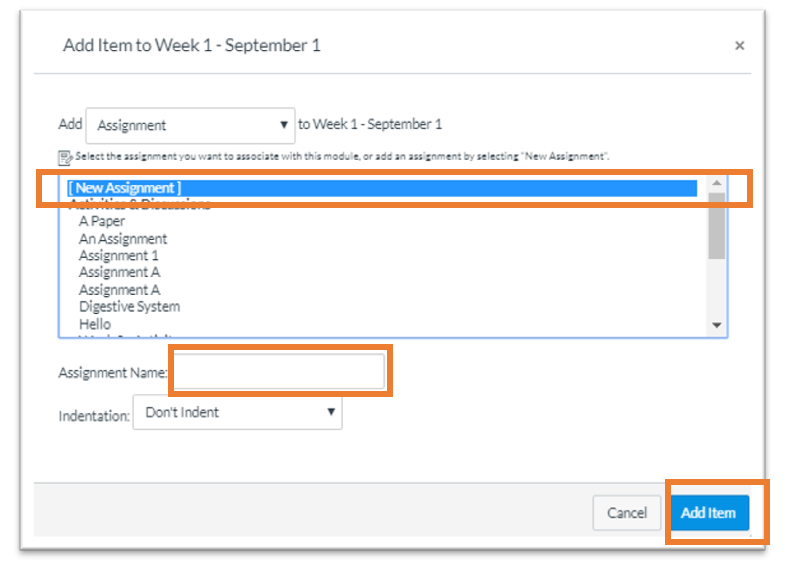
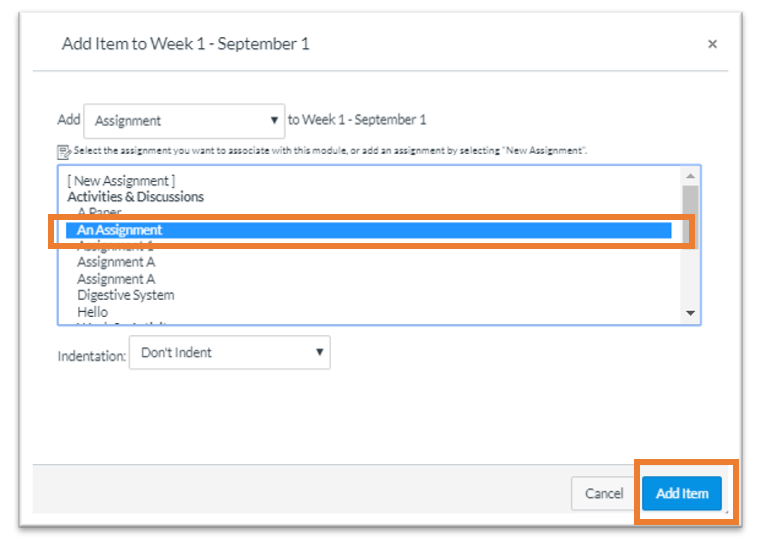
  1. Upload

To share a file with students, you must upload it to OneDrive first.

To upload to OneDrive on the web (onedrive.com)
  1. Go to onedrive.com and sign in using your Microsoft (Office) 365 credentials (same as your CIIS email credentials).
  2. Drag and drop the file from your computer onto the correct folder.
To upload using the installed OneDrive desktop client
  1. If you are working in a document and want to save it to OneDrive, go to File > Save a Copy > OneDrive – CIIS > navigate to a subfolder as needed > Save.
  2. To save a file or folder from your computer to OneDrive, drag the file or folder into OneDrive – CIIS in your File Explorer or Finder.

If you experience any issues with synching, visit the Microsoft support article or contact CIIS IT at support@uswired.com.
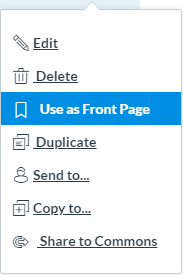
  1. Share

Important information about sharing per FERPA student privacy guidelines
Read this first

Please note the following security options:
Not secure: Selecting Anyone with the link means the document can be viewed by anyone on the web.
DO NOT USE THIS OPTION.
Somewhat secure: When choosing People in CIIS with the link, recipients must log in to Microsoft (Office) 365 (same credentials they use for email). Anyone in CIIS with the link will be able to access the document, whether they receive it directly from you or forwarded from someone else.
More secure:
Specific people requires entering the individual email address for each share recipient. You may include non-CIIS email addresses. It gives access only to the people you specify, although other people may already have access. Even if people forward the sharing invitation, the link will only work for those who were specifically granted access.
– Use People with existing access to send a link to someone who already has access. (For instance, someone with inherited permission from the parent folder.)

Allow editing: When you share items with this type of link, people can edit files (e.g. collaborate in a document). If you are sharing a folder, this option allows them to add/delete/copy/move/edit/rename/share files within it. Recipients can forward the link, change the list of people sharing the files or folder, and change permissions for recipients.

For the Microsoft support page including an overview video, please click here.

  1. Select Share at the top right of your document.share icon
  2. Select the location where you wish to upload your file.
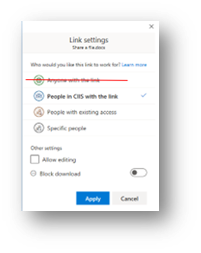
  3. Select the arrow  to choose permissions for the link you will be sharing:the arrow to choose permissions for the link you will be sharing
    Options include:
    1. Anyone with the link (this option is not secure)
    2. People in CIIS with the link
    3. People with existing access
    4. Specific people
  4. (Optional)
    1. Checkmark Allow editing to allow share recipients to change the document.
    2. Click Block download to prevent sharers from downloading it (for Word and Excel documents only).
    3. Set expiration and Set password (only available when choosing Anyone with the link).
  5. Select Apply to save the permissions.
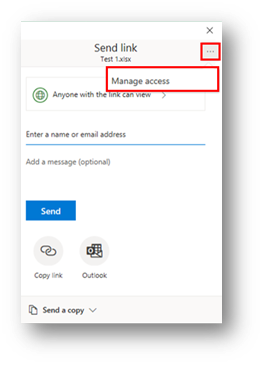
  6. Copy the link or email it automatically.
    1. To copy a link, select Copy Link:copy link iconThen paste the link where you wish (e.g. Canvas, an email message, etc.).
    2. To have Microsoft email it, enter the name or CIIS email address of people you want to share with.
      1. Type a message.
      2. Select Send.
      3. Recipients will receive a notification to their CIIS email account. You will be notified when they have accessed the linked item.
  7. When recipients click on the link, the document will open in a browser.
  8. To see who you shared the document with, click Share > 3 dots > Manage accessThe button with three dots, and the manage access button in the Share pop-up menu
  1. Common share options

    1. People in CIIS with the link

This level of sharing is somewhat secure. It is generally fine for any documents that don’t contain student information, e.g. a lecture. Optionally, you can allow editing. Also, you can select Block download (for Word and Excel documents only).The "Link Settings" pop-up menu. The share option reading, "People in CIIS with the link," is highlighted.  Below is the "Allow editing" checkbox, and the "Block download" toggle.  The "Apply" button is at the very bottom.

    1. Specific PeopleThe "Link Settings" and subsequent "Send link," pop-up menu. In the "Link settings" menu, the share option reading, "Specific people," is highlighted.  Below is the "Allow editing" checkbox, and the "Block download" toggle.  The "Apply" button is at the very bottom. In the "Send link" menu, a text field is highlighted with an arrow reading, "Insert email addressed separated by semi-colons here." pointing to it.  Below the "Copy link" button is highlighted.

This level of sharing is more secure. It requires manually entering each share recipient’s email address.

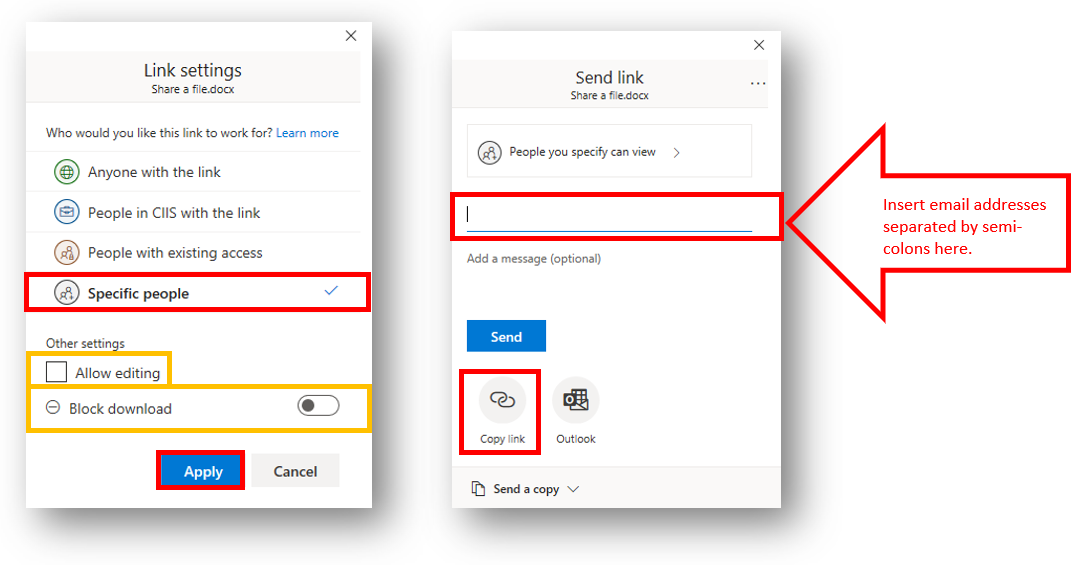
      1. Select Specific people.
      2. (Optional) You can Allow editing.
      3. (Optional) You can select Block download (for Word and Excel documents only).
      4. Select Apply.
      5. A new window will open. Enter email addresses separated by semi-colons, or select the suggested names (make sure you’re selecting the correct email address if the recipient has both a Mymail and regular CIIS.edu account).
      6. To copy a link and paste it into an email message or elsewhere, select Copy link.
        1. Alternatively, select Send to have Microsoft send an email notification for you. This way you will be notified when they have accessed the linked item.

Take a screenshot

Create smaller image files by using your device’s screenshot function

Some applications will generate large image files. To create a smaller version, you can capture a screenshot of the image and use that file instead. This can be helpful when using platforms like Canvas that employ storage quotas or limits.

On a Macintosh, you can either:
–          save the screenshot as a file:
This will save the file as a .png to your computer. Then you can upload it to Canvas or another app.
or
–          copy it to your clipboard:
This allows you to quickly paste the image in any application that will allow you to do so (e.g. most Microsoft apps such as Word), as opposed to uploading it.

On Windows, the screenshot will generally save to your clipboard. Then you can save it as a file by opening an image editing app (e.g. Paint), then pasting the image and saving the file.

Please note that Canvas will not allow you to paste a screenshot. Instead, the image must be saved as a file before being uploaded.

The steps for taking a screenshot will vary by device. Below are the instructions for Mac and Windows.

Macintosh computers

Take a screenshot and save it as a file
  1. To save a portion of the screen to your computer, on your keyboard press CommandShift4 simultaneously:An apple keyboard with the command key, the shift key, and the number 4 key highlighted
  2. Your cursor will change to a cross-hair. Click and drag to select the area you wish to capture.
  3. Release the mouse button.
  4. The image will automatically save by default as a .png file to your desktop. It will be called Screen Shot with the date and time, for example:Mac OS finder window with a sample image file highlighted
  5. You can upload it to another app as needed.
Take a screenshot and paste it
  1. To copy a portion of the screen to the clipboard, on your keyboard press CommandControlShift4 simultaneously:An apple keyboard with the command key, the control key, the shift key, and the number 4 key highlighted
  2. Your cursor will change to a cross-hair. Click and drag to select the area you wish to capture.
  3. Release the mouse button.
  4. In your other application (e.g. Word), paste the screenshot.

Windows computers

  1. To copy a portion of the screen to the clipboard, on your keyboard press the Windows key + Shift + S:A windows keyboard with the windows key, the shift key, and the letter S key highlighted
  2. Your cursor will change to a cross-hair. Click and drag to select the area you wish to capture.
  3. Release the mouse button.
  4. In your other application (e.g. Word), paste the screenshot.

    If you wish to save it as a file instead of copy-pasting it, then open an image editing program (e.g. Paint). Paste it there, then save it as a .png or .jpg file.

    A JPG file should be fine in most cases. (While the quality of JPEG files might be slightly diminished due to compression, the file size will be smaller.)

Upload a profile picture

The instructions below explain how to add a profile photo to Canvas, and to delete a profile picture.

Files can be any type (.jpg, .png, .gif) or size as long as you have room in your My Files folder to store it. Canvas recommends that your file size be as small as possible.

Add a profile picture

In the gray global navigation menu, click on Account > Profile > Edit profile:Account button in global navigation menu and the link to edit profile settings, reading, Profile

Then click on your profile image:sample profile image

A new window will open.

To upload a new picture

  1. Click the Upload a picture tab:upload a picture tab
  2. Drag a picture from your desktop and drop it into the uploader.

    Alternatively, you can click the Choose a picture link > browse your computer for a picture > select it > click Open.

  3. (optional) You can crop the image.

    Use the mouse to drag a rectangular handle or use the arrow keys to move the selection and shift+arrow keys to resize the selection:The rectangular handle used to resize a profile image selection

  4. Click Save.

To take a picture

Click the Take a picture tab > your image will appear > click Take picture > Save:The Take a Picture tab is highlighted, below is the take a picture button, and the save button is to the bottom right

To use Gravatar

If you have a Gravatar account, you can use it to add an avatar.

Select the From Gravatar tab > enter your Gravatar email address > click Preview > click Save:The, From Gravatar, tab is highlighted, below is preview button, and the Save button at the bottom-right

Your selected profile picture will appear instead of the placeholder profile image.

Delete a profile picture

Profile pictures are saved in your personal files. You can delete old profile pictures to save storage space. The My Files folder has a storage limit of ~52 MB.

To delete a file, go to Account in the gray global navigation menu > Files:The account button in the gobal navigation menu, and the link to Files

Select the profile pictures folder:the profile pictures folder

Next to the file you want to delete, select the Options icon > Delete:The button with the three dots to the right of the image file.  The option, Delete, is selected in the drop-down menu coming from the button.

Roll Call Attendance tool in Canvas

The Roll Call Attendance tool is optional.

The tool involves timing:
• You must first take attendance once (this generates an Assignment item).
• Make any changes early on.
• Don’t make additional changes.

By default the Roll Call Attendance tool is worth 100 points. Roll Call divides the total value by the number of days attendance was taken.

If your course uses weighted grades, or if Attendance should be worth anything other than 100 points, the default can be changed.

Please contact onlinelearningsupport@ciis.edu after the first time you take attendance for help making changes, or if you have any questions.

To use the Roll Call Attendance tool

  1. Log in to ciis.instructure.com. Click on your course.
    1. If you don’t see your course:
      1. Click on Courses in the gray global navigation menu
      2. Click All Courses
      3. Click on your course
  2. Click Attendance in the course navigation menu
  3. By default, Roll Call displays the List View tab [1], which shows all students in a list format. If you wish, you can view the class in the seating chart format by clicking the Class View tab [2]. Make sure your course is selected [3].The number 1 next to the list view tab, the number 2 next to the class view tab, the number three with an arrow pointing to the course selection drop-down menu
  4. View Attendance Dates.The number 1 with and arrow pointing to the arrow icon next to the date, and the number 2 with an arrow pointing to the calendar icon

    By default, Roll Call will display the current date.

    You can edit attendance records for a different date by using the arrow icons next to the date [1] or by clicking the Calendar icon [2].

  5. Take Attendance in List View:The number 1 with a box highlighting the attendance icon next to each student's name. The number two next to the Mark All Present button.  And the number three next to the Unmark All button.
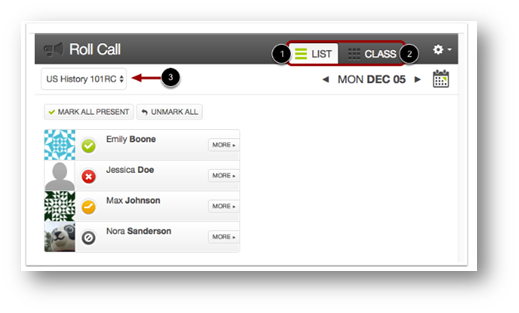
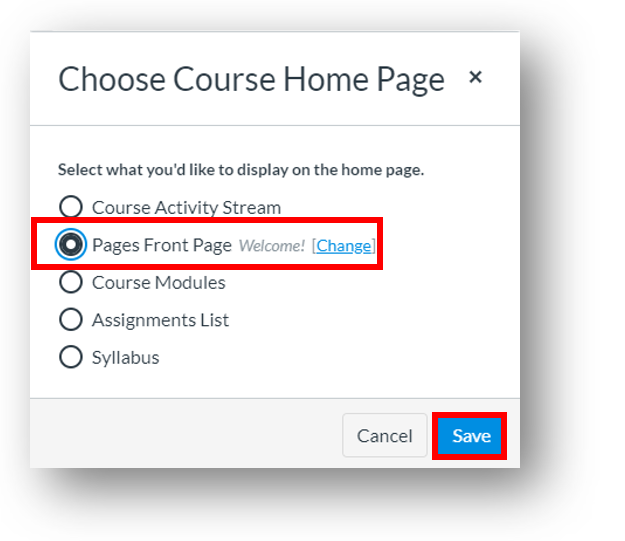
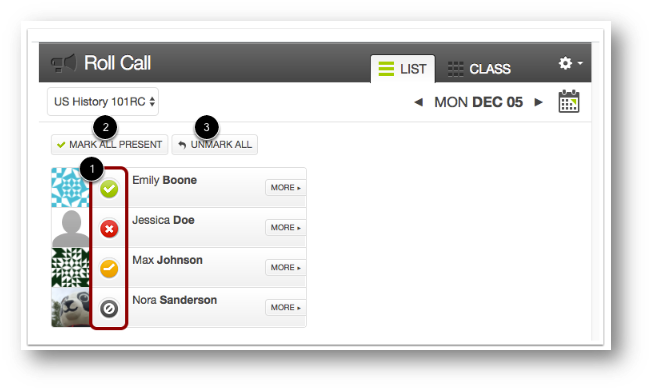
In the List View, you can take attendance by toggling the correct mark next to each student’s name [1]. Click the attendance mark until you arrive at the desired mark:
    • To mark the student as present and on time, click one time (green check mark icon).
    • To mark the student as not present, click two times (red icon).
    • To mark the student as late, click three times (orange clock icon).
    • To unmark the attendance status, leave the button as the default (gray null icon). Points will be neither awarded nor deducted for attendance for this day.

    You can also take attendance by clicking the Mark All Present button [2].
    If you need to start over or clear all attendance entries, click the Unmark All button [3].

  6. Take attendance for each class meeting. Select the date by using either the calendar icon near the top right or the arrows to scroll to the correct date.
  7. After you’ve taken attendance once, you can edit settings such as point values or weighted percentages. Please make sure to make any edits as soon as possible after the first time you’ve taken attendance, since certain edits cannot be made once the tool has been in regular use. Once you’ve made edits, do not make changes again. Please contact onlinelearningsupport@ciis.edu after the first time you’ve taken attendance if you’d like help making edits.
  8. If your course uses weighted grades, go to the Assignments tab. Confirm that the Rollcall Attendance tool appears in the correct group (e.g. Attendance) so that it will be weighted using the correct percentage.
    If Rollcall Attendance appears in a different group, drag and drop it using the 8 dots into the correct group.

How do I handle an excused absence?

Although Roll Call doesn’t have an “excused” category, here are two ways you can manage this.

Method #1: Mark them as either Absent or Present

You can always retroactively mark a student as present or absent for a day that has passed. Click the calendar to go back to a past date and change the student’s attendance.

  • Marking them Present will give them points for attendance that day.
  • Marking them Absent will deduct attendance points for that day.

Method #2: Just Ignore It

If a student is absent one day, and you allow two unexcused absences (for example), just don’t take attendance for that student that day.

  • An unmarked status will count neither for nor against the final score. You can leave their status on the default “unmarked” category.
  • If you wish to keep track of how many times a student had an excused absence, use a badge.

Roll Call allows you to create “badges” within its attendance tool. These badges are like a private “tag” that only you can see.

    • This will help you keep track, but when used alone has no effect on the Attendance score.
    • You can create a badge called “Excused.” Then, apply it to students who have used up one of their excused absences.
    • To create a badge:
      • In the Attendance tab, go to the date you wish to mark.
      • Click on More next to any students’ name
      • Click Add badgeThe button reading, More, next to a student's name, and the add badge button

In the dialog box that appears, fill in each field:

  • Title, e.g., “Excused”
  • Choose an icon
  • Choose a color
  • Then click Save BadgeThe text field for entering the badge title, the badge icon selection box, the badge color selection box, and the save badge button

You’ll see the badge appear.
To select the badge for that student, click it until it turns the color you’d chosen. You can unclick it at any time.The excused badge appearing next to the student's name

Later on you can see how many excused absence they’ve accumulated by either:

  1. Going to every course meeting using the calendar and checking for that student’s badge, OR
  2. Generating a report. To generate a report:
    1. Go to the gear icon > Attendance Report.
    2. A spreadsheet CSV file will be emailed to you instantly.
    3. Use it to see when a student was Unmarked, then refer to the Rollcall Attendance tab to see if you’d entered a badge for that date. (The report doesn’t contain badge information).

Proctor an exam virtually

Please use the steps below if you are giving an exam in Canvas that will be monitored during a virtualized course meeting.

Fifteen minutes before class

  1. In Canvas: Hide Files and any other tabs that might hold clues/answers to your exam.
    1. For a video walkthrough, please watch the Hide navigation in Canvas video. 
  2. In email: Receive the webinar link via your CIIS email account; log in to your webinar.

At class start time

  1. In Canvas: Publish the exam.
    1. This sends a notification to students. They might try to access the exam immediately, which is why we don’t publish too far in advance. (Although we may have put availability dates on the exam, publishing a proctored exam too early can still cause unnecessary confusion.)
  2. In webinar:
    1. Explain the process to students:
      1. The exam has just been published. You might have received an automatic email notification.
      2. You’ll have XX hours until XX:30 am to finish the exam. If you run out of time and don’t hit submit at the very end, don’t worry–Canvas will save and submit the answers that you had completed (they are not lost).
      3. When you’re finished, please let the instructor know in the webinar by chatting them privately. The instructor will let you know if class will resume in the webinar, or if you’re done for the day.
      4. Please turn on your webcams and mute yourselves.
      5. If you wish, you can minimize the webinar by clicking the squares at the extreme top right of the webinar window.
      6. Use Chrome or Firefox only. Log in to Canvas and go to the Quizzes tab and start taking the exam.

After the exam

  1. Unhide the Files tab and any other items in the course that you may have hidden.
  2. If students need to retake the exam, you can allow an extra attempt:
    1. Go to the exam in Canvas. Click Moderate this Quiz at the far right:Moderate This Quiz button
    2. In the page that opens, click the pencil next to the name of the student:pencil icon

      Here, you can see how long the quiz took each student to complete. (Also, you can view this while a class is still taking an exam in order to see in real time which students are still taking the quiz and which have completed it.)

    3. In the dialog box that opens, enter the # of attempts to grant. If the availability dates have passed and the exam is now closed, checkmark Manually unlock the quiz for the next attempt. Click Save:The field to enter number of attempts, the check box to manually unlock next quiz attempt, and the Save button for the Student extensions dialogue box

Troubleshooting

  1. If students can’t see the exam after you published it, have them refresh their browser.
  2. If students can’t see images that are in the quiz, make sure they’re using Chrome or Firefox only (not Safari, etc.). If they already started the exam in Safari, they can leave it open while logging in to Chrome or Firefox simultaneously. Then if they wish, they can close the first instance of the exam. They don’t have to do so—responses aren’t browser-dependent so Canvas will record their responses without issues.
  3. If students can’t be heard/seen, have them log out and then log back in to the webinar. If they’re still having trouble and the exam is during a virtualized course, please have them visit www.vclhub.com for immediate chat support.

Create a Canvas Message

Use the Inbox tool

The Canvas Inbox (also called Conversations) is an in-platform messaging tool that can be used with or instead of traditional email. It may be used to communicate with a course, a group, or an individual student.

In order for students to receive a message using the Inbox tool, the course must first be published. If your course is not published yet, you might consider sending an email instead.

Generally, upon receiving a message via the Inbox, students will receive an email notification. This depends upon their individual notification settings, which can only be selected by each user.

  1. Log in to Canvas.
  2. Click Inbox in the global navigation menu:Canvas global navigation menu with the inbox button selected
  3. Click the Compose icon in the top ribbon:compose icon
  4. In the dialog box that opens, select the course, e.g. IHL Cafe.
  5. In the “To” field, click the address book icon:address book icon
  6. Make your selection, e.g. Select Students then All in Students.
    • To choose a specific student, click Students then click on the student’s name.
  7. Type a Subject.
  8. (Optional) Checkmark Send an individual message to each recipient to prevent students from “replying all.” Instead, replies will only be sent to the original sender rather than the entire group.
    Please note: If there are over 100 students in a course, individual messages will be sent automatically.
  9. Type your message in the next field; click Send.

Grade Displays

By default, the Total column will display as a percentage.

If you use unweighted Assignment groups in your course, you will be able to change the Total column to display as points. When Assignment groups are weighted, points cannot be displayed for the total grade.

Change the Total Grade to Points or Percentage in the Grades tab

You can change the final grade to display as either points or a percentage.

  1. Log in to Canvas. Go to the Grades tab.
  2. Go to the Total column to the far right (you may have to scroll to the right).
  3. Click the 3 dots in the Total column header.
  4. Select Display as Percentage / Points.
  5. The update will take effect immediately.The dropdown menu coming from the button with three dots in the Total column of the gradebook tab. The dropdown menu option reading "Display as Percentage" is highlighted

Change Grade Display for Individual Assignments

You can change the grading type by Assignment.

  1. Log into Canvas. Open the Assignment in edit mode. If you don’t know how to get into edit mode, please contact onlinelearningsupport@ciis.edu.
  2. Under the Editor box, select the dropdown arrow next to Display Grade As.
  3. Select the display type:The dropdown arrow next to Display Grade As in the assignment Editor
  4. Scroll down and click Savesave button

Set Course Home

The Home Page of Canvas is usually set to Modules, the Syllabus, or a Page.

  1. To choose an item as Home, click on the Home tab.
  2. In the menu along the far right, select Choose Home Page:Choose Home Page button
  3. In the dialog box that appears, make your selection.
    If you wish to set a Page as Home, please jump to the next section.Choose Course Home Page pop-up menu
  4. Click Save.
  5. Click on the Home tab. It should now display your selection.

Set a Page as Home

  1. To set a Page as Home, click on the Home tab > Choose Home Page.
    1. You will see either Front Page must be set first or Change.
      Example of Front Page must be set first:Front Page must be set first link is near the bottom of the Choose Course Home Page popup menu
      Example of Change:Change link is near the second radio button on the Choose Course Home Page popup menu
      1. If you see Front Page must be set first, click it. This will open the Pages tab.
        1. To create and set your Front Page, click the +Page button near the top right:Add page button
        2. In the page that opens, enter a title and any other elements. Click the Save & Publish button:Save and publish button
        3. Return to the index view by clicking the View All Pages button:View all pages button
        4. Set the Page you created as the Front Page by clicking the 3 dots at the far right of the title:button with three dots
        5. Select Use as Front Page:Drop-down menu with the options reading, Use as Front Page highlighted
      2. If you see Change, this means that you had previously created a Front Page and can now select a different one.
        1. Click Change. This will open the Pages tab.
        2. Make sure the selected Page is published. It should have a checkmark within a circle:Published icon
        3. Set the selected Page as the Front Page by clicking the 3 dots at the far right of the title:button with three dots
        4. Select Use as Front Page:Drop-down menu with the options reading, Use as Front Page highlighted
        5. Return to the Home tab.
        6. In the menu along the far right, select Choose Home Page:Choose Home Page button
        7. Select Pages Front Page:The choose course home page pop-up menu.  The radio button reading near the word Change is highlighted.  The Save button is in the bottom right corner
        8. Click Save.
        9. Your new Front Page will now appear when you click the Home tab.
      3. Click +Page at the top
      4. In the page that opens, enter a title and any other elements. Click the Save & Publish button
      5. Click View All Pages to see an index of your pages
      6. Set it as the Front Page by clicking the 3 dots button with three dots
      7. Select Use as Front Page:Drop-down menu with the options reading, Use as Front Page highlighted
  2. Return to the Home tab.
  3. In the menu along the far right, select Choose Home Page:Choose Home Page button
  4. Select Pages Front Page:The choose course home page pop-up menu.  The radio button reading near the word Change is highlighted.  The Save button is in the bottom right corner
  5. Click Save.
  6. Your Front Page will now appear when you click the Home tab.

How should I grade participation?

Not all courses will include participation as part of its grading scenario. Please refer to the Course Assessment portion of your syllabus.

  1. Is your Syllabus set up correctly?

    In viewing your Syllabus, you might notice that Attendance and Participation are contained within the same line-item (screenshot below). They shouldn’t be.A sample syllabus with the line-item reading, Class Attendance and participation, highlighted
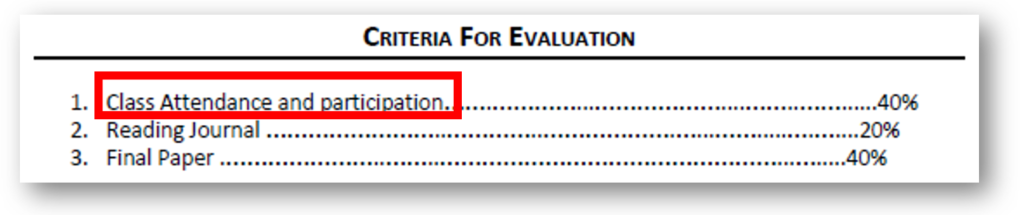
Instead, Attendance and Participation should be two distinct items:

    • Attendance is whether one actually came to class (whether that meeting is virtual or in-person)
    • Participation is a measure of the student’s engagement.

    For instance, you can have a student who attended every single class but never really participated.

    In Canvas these line-items must be broken down into the 2 separate items that they actually are.

  2. Once you have decided how many points/percentages participation will be worth, we need to think about how you will evaluate it. There are 3 main ways to set up Participation scores in Canvas:
    1. You can enter a score for each course meeting, and for each student.
      This will create many grade-able columns in the Grades tab, where you’ll enter scores. So if you have 12 course meetings, you’ll create 12 Participation Assignments. If you have 10 students, that’s 120 Participation grades.
    2. You can enter an overall score for the entire semester.
      This means you can create a single Participation Assignment that will be graded at the end of the semester. Please note that grading this way can be very subjective and difficult to substantiate.
    3. You can enter scores for specific course meetings.
      This is a good option if some course meetings are designed to be more participatory than others. You can create a Participation Assignment in Canvas only for those meetings.
  3. Make sure the Participation Assignment(s) are consistent with your grading scenario.
    1. If your course uses the Total Points grading model, find the number of points each Assignment should be worth. Divide the total Participation points by the number of meetings you’ll grade (e.g. 100 points / 10 classes = 10 points per Assignment).
    2. If your course uses the Weighted Grades model of grading, please see the Weight Grades video. You may need to log in to Microsoft 365 using your CIIS email credentials.
    3. If you’re unsure whether your course uses the Total Points or Weighted Grades scenario, please contact onlinelearningsupport@ciis.edu.

Create a Module and Add Items

Modules can be used as a sort of table of contents to ease navigation for your students. You can organize material into categories by week, topic, etc.

After you have created your Modules, you can choose to set it as your Canvas Home tab. For instructions, please see this article called Set Course Home.

Create a Module

  1. Go to the Modules tabThe Modules link in the course navigation menu
  2. In the upper right corner, click +ModuleThe add module button near the top right of the Modules tab.
  3. Add the Module Name (e.g. Week 1 – September 1) and Click +Add ModuleThe Add Module pup-up window with the Module Name entry field, and the Add Module button highlighted
  4. You’ve created your Module (you may have to scroll to the bottom of the page).A newly created module

Create an item within a module

  1. Click the add item button within the moduleThe add item button in a module
  2. Click the Add dropdown menu and select one of the following item types:
    • Assignment
    • Quiz
    • File
    • Page
    • Discussion

    The add dropdown menu in the Add Item pop-up window

    1. If you’re adding a new item, click the [New] link, type a name in the name field that will open, and click Add Item.The option, New Assignment, in the add item list, the field for entering the assignment name, and the Add Item button.

      Depending on the item type, when adding new content you may be asked to complete additional fields.

    2. If you’ve already created the item you want to add (you may have already created it in the Assignments or Discussions tab), then click the name of the item to display it within Modules.

      Then click Add Item.An existing assignment is selected in the add item list, and the Add Item button is at the bottom right

  3. You have now created the shell of the item. It will appear within the module.The new assignment as it appears in the module
  4. To create the item’s content, click on the title. You will see a preview of the item.

    Click Edit in the upper right.Edit button

  5. Enter the content into the Editor box (prompt question, description of the assignment, etc.).
  6. Complete the fields below the Editor box, which depend on the item type.

    (Please contact onlinelearningsupport@ciis.edu if you have questions about any of these fields.)

    Tip: For Assignments, the most common fields that must be completed are:

    • Points
    • Submission Type
    • Due
  7. Click Save in the bottom right corner.Save button
  8. You will see a preview of your new itemNew item preview
  9. Return to the Modules tab to continue building the next module or item.