Enable screenshare for Mac computers

To watch the video below, click play.

To enlarge the video, select the fullscreen icon:
Fullscreen icon.
To hide or show subtitles, select the CC icon:
CC icon.
To jump to a specific section, select the table of contents icon:
Table of contents icon.
You can select a chapter (on certain videos only), or type a term into the search field and select a returned result.

For immediate chat support during a virtualized course meeting, please visit www.VCLhub.com.

The video below is intended for Mac computer users with an operating system of version 10.15 (Catalina) or higher.
 

It explains how to manually allow screensharing for applications like Zoom or Chrome and Firefox.

It demonstrates:

  • checking your OS version
  • enabling screenshare within your computer’s system preferences.

View instructor annotations on your papers

While grading your Assignment, your instructor might choose to provide feedback which can include an overall comment and/or annotations on the file itself (much like the comments feature in Microsoft Word). These annotations can help you learn how to develop your work.
 
Please note that most file types can be annotated (.doc, .docx, .odt, .rtf, .txt, Powerpoints, Excel, etc.). However, Assignments that are submitted as Text Entry, Website URL, or Media Recordings cannot be annotated.  Also, some instructors do not use the annotation feature.
 
If you know that your instructor has provided annotations on your Assignment and you would like to access it, please use the instructions below.

  1. Use Chrome or Firefox to log in to your course.
  2. Go to the Grades tab in the course navigation menu.
  3. Select the title of the graded Assignment you wish to view.
  4. Click View Feedback near the top right:View feedback link near the top right of the Assignment
  5. This will open the document in DocViewer within Canvas.
  6. To view the file better, you can download it by clicking the download icon:Downward arrow near top left of the preview window
  7. Depending on your browser settings, the file might download to your computer or open in a new tab.
  8. Open the file. If your instructor provided annotations, you will see them on the page. You might need to hover over the annotation in order to see the associated comment:Cursor is hovered over highlighted text. There is a comment within a popup window.

Canvas Notifications for Students

Notifications are sent to the email address that is specified in your Canvas account.

For detailed instructions about setting student notifications, please check the Canvas guides here.

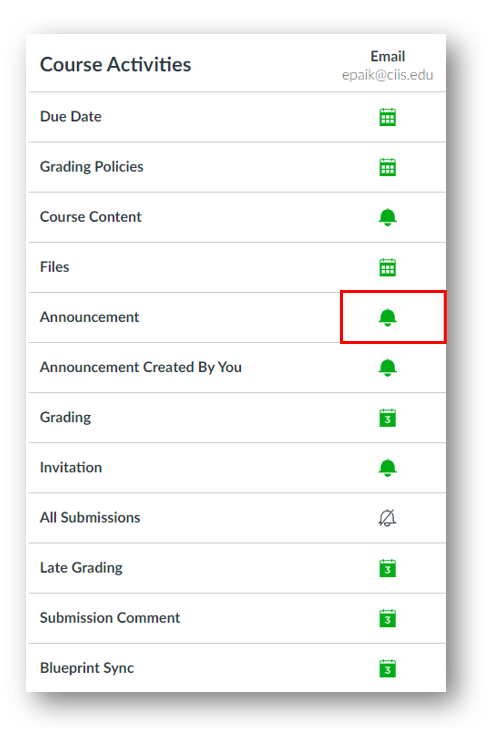
Notification cadences are detailed below:

  • The Notify immediately icon indicates that you will get notifications for these activities immediately: Bell icon
  • The Daily summary icon indicates that you will be sent a daily digest around 6 or 7:00 pm Pacific daily:
    Calendar icon with a number on it
  • The Weekly summary icon indicates that you will be sent a digest on Fridays at around 6 or 7:00 pm Pacific:Calendar grid icon
  • The Notifications off icon mutes this notification:Bell icon with a line through it
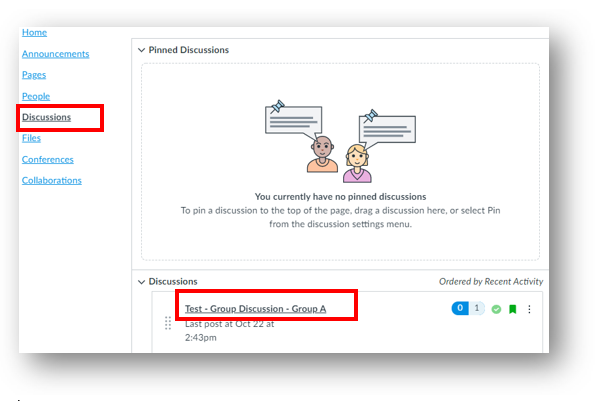
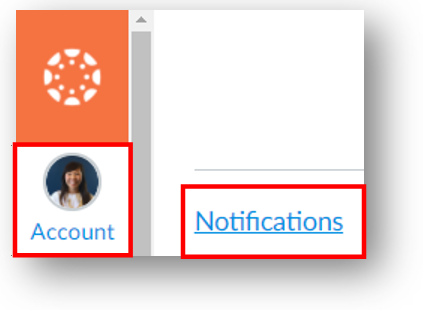
  1. To update notifications in Canvas, start by going to Account in the gray global navigation menu. Then click on Notifications:Account button in the global navigation menu with Notifications in the sub-menu.
  2. We suggest setting the Announcements activity to Notify immediately.

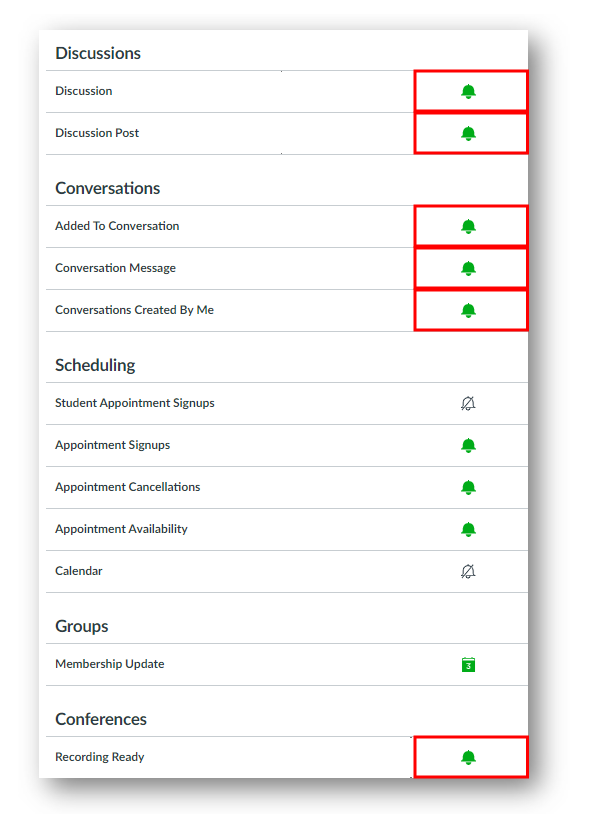
3. Likewise, select Notify immediately for Discussion, Discussion Post, Added to Conversation, Conversation Message, Conversations Created By Me, and Recording Ready. If you find that you are receiving notifications too often, you can modify them later.

Your changes will auto-save (no need to press a save button).

Access a Group Discussion as a student

Only students who have been placed into groups by an instructor will have access to the Groups button.

  1. In Canvas, click Groups in the gray global navigation menu, then click All Groups:

Groups button in the global navigation menu with a link called All Groups in the sub-menu.

  1. A new page will open. In the Current Groups section, click on the Group you wish to access:

A list called Current Groups with links to Group 1 and Group A

  1. This will open a mini-space within Canvas for that group. If you wish to post a Discussion, click on Discussions. Then click on the title of the Discussion forum you’d like to access:Discussions tab in the course navigation module along the left with a link to a Discussion in the center of the page.
  2. Submit your post.
  3. If you have several Groups and want to post in a different one, repeat steps 1-4.
  4. To return to the main course, click Courses in the gray global navigation menu > click All Courses > select the course.

Install OneDrive and Upload a file or folder

You can upload a file using either the web-based version of OneDrive or the installed desktop client. For an overview of the difference between them, see this training recording (end at 10:27). Sign-in to Microsoft (Office) 365 might be required.

If you wish to install OneDrive, first confirm that it is not already installed by going to the magnifying glass at the top right of your computer and typing OneDrive (Mac). On a PC, go to the magnifying glass at the bottom left of your computer, type OneDrive, and press Enter. Most Windows computers purchased after 2015 will already have OneDrive installed.

    • If you don’t see the OneDrive App as a search result, follow the steps below. For a demonstration of installing OneDrive, watch this Microsoft support video.
    • If you need help installing OneDrive, contact CIIS IT (support@uswired.com). This is suggested if you:
        • are using a Mac and wish to integrate OneDrive with your finder (which is recommended). This requires an extra step;
        • have an existing OneDrive profile (either a personal account or through another institution);
          OR
        • already have Office installed and need to delete it and install a newer version.

(optional) Install OneDrive

  1. To install OneDrive, go to office.com and sign in with your Microsoft (Office) 365 credentials. These are the same as your CIIS email credentials. Then click Install Office:Install Office next to a downward arrow
  2. Then select Office 365 Apps.
  3. Depending on your browser, select Run (in Edge or Internet Explorer), Setup (in Chrome), or Save File (in Firefox).

    If you see the User Account Control prompt that says, Do you want to allow this app to make changes to your device? select Yes.

  4. Your installation is complete when you see You’re all set! Office is installed now and an animation showing you where to find Office applications on your computer. Select Close.

Upload

To share a file with students, you must upload it to OneDrive first.

  1. Go to onedrive.com and sign in using your Microsoft (Office) 365 credentials. These are the same as your CIIS email credentials.
  2. Drag and drop the file from your computer onto the correct folder.

To upload using the installed OneDrive desktop client

  1. If you are working in a document and want to save it to OneDrive, go to File > Save a Copy > OneDrive – CIIS > navigate to a subfolder as needed > Save.
  2. To save a file or folder from your computer to OneDrive, drag the file or folder into OneDrive – CIIS in your File Explorer or Finder.

If you experience any issues with synching, visit the Microsoft support article or contact CIIS IT at support@uswired.com.

Change your password in Microsoft (Office) 365

  1. Log in to Microsoft 365 (formerly Office 365): www.office.com
  2. Click on the gear icon:
  1. Click the Change your password link: the link is near the bottom of the Settings tray
  2. Change your password.
    • It must be at least 12 characters
    • It must contain a combination of at least three (3) of the following type of characters: uppercase letters, lowercase letters, numbers, symbols (punctuation marks)
    • It must not contain the user’s user name
    • It cannot reuse a previous password

the "change password" page shows three fields: old password, new password, and confirm new password